
Back in 2009 (remember 2009? Your iPhone wasn't quite 3 years old yet and Slovakia just adopted the Euro) I reviewed a pretty spiffy piece of kit called the 8mm Distress Kit. Back then in the before-time™ it was in SD.
But, now, in the future world of today when your iPhone 4S shoots 1080HD footage the kit's gone Hi-Def, and only for a modest increase in price. What was then in then dollars was $35, is today, in today's dollars only $59.
In the virtual box you'll get 2 files which contain 28 clips sized at 1440x1080 running at 29.97 or 25fps if you swing that way.
The crazy thing is that this comes at the perfect time for me for a documentary that I've been working on for the past 86 years (well, it feels like 86 but if you want to get down to brass tacks, it's technically closer to 85) which involves super-8 footage and I wanted something to help me obtain some visual interest with some bland-talking-head interviews I've been handed which run the gamut from HD all the way down to SD DV tapes to even some (hold on to something) Flip footage. *gasp*
I think Mediapreview.net's HD 8mm Distress Kit is not only going to help make the documentary look like it cost more but I'll be able to invoice for more since it looks like it costs more which will make it cost more so it's all honest that way.
Check it out, give it a spin; there are some samples to play around with, a nifty little tutorial and more on their site. And with film going away, but people still having an intense interest in it's qualities (look at Instagram, lomography, me taking well over 11,000 photos with my nearly 8 year old cell phone just because they look "lo-fi" and cool), and the feature film Super-8, it looks like the super-8 look as well as the clean-slate innocence of that bygone time which accompanies it won't be forgotten soon.
It's funny; my assistant has never shot or touched film, never placed a needle on a phonograph record and has only seen 8-tracks on tv. He's never used a pay-phone or adjusted rabbit-ear antennas, either.
But there is something that speaks to us visually through the ages with film; there's a strange personal investment -or perhaps connection is a better word- in it when we see something shot on film, especially older formats like 8mm, super-8 and 9.5mm (look it up). There's some manner of ephemeral hypotactic permanence with it that digital just can't obtain. Sure digital is beautiful, the future and in many many ways better than film but the tangible hic et nunc of it is difficult for our minds to grasp; you have a pocketful of little digital cards or "files" tucked away in the dark recesses of a hard drive, unlike film where you can simultaneously see and hold history and memories and movement literally right in your hands...without needing any batteries.
Maybe it's the analog simplicity of it that encourages us to capture (and indeed slow down and notice) the simple things in life, and for that matter life itself. But then again, I'm old and have an 8 year old cell phone.
Give the kit a whirl and see how it changes the flavor of your footage, not just stylistically, but perceptually. To me it gifts digital footage with an import that it otherwise doesn't have. That's the language of film at work; that's why tilt-shifted footage looks miniature and in my mind and for my money, adding effects like what's in the distress kit makes footage as large as life.
Showing posts with label filters. Show all posts
Showing posts with label filters. Show all posts
Tuesday, October 18, 2011


Tuesday, July 26, 2011
Rendering High-Precision Requires A Graphics Card with More Capabilities

Without getting into great detail, with that Final Cut is telling you that it can't render what visual effect you want (have applied to a clip or nest) in high-precision because of one of two things (or both).
1. Your graphics card simply can't handle it. You'll need to upgrade.
2. If you're lucky you can adjust a setting and render in slightly less than "high-precision" with some caveats.
A: Highlight the sequence that has the troublesome clip & effect in it in the Browser and hit Command + 0 for Sequence Settings. Fortunately, in here, changes you make DO apply to the current sequence.
B: Click on the Video Processing tab and you'll see something like this:

See the four radio buttons on the left? Try setting your sequence settings to something other than it currently is. RGB is usually good for this problem.
But read the two paragraphs of text to the right there. Rendering with different Video Processing settings can cause colors to go all wonky.
C: Hit OK and test, test and test some more.
Friday, December 4, 2009
Quickly Move Through Multiple Clip's Filters Via Keyboard

Let's say you need to make some differing adjustments to a series of color correction 3-way filters for some clips in sequence in the timeline. Rather than sit there and double-click through each one try this:
01) Double-click a clip to load it into the Viewer. (Alternately, highlight it and tap Enter)
02) Then (with the Viewer window having focus) use "Go to Next Edit" on the keyboard. It's Shift + E or Control + 8 or (Apostrophe).
03) As you move to each Next Edit per keystroke, the Viewer's Filter's tab will update to represent each clip the playhead is at the beginning of in the Timeline. The Viewer will act as though you have Open or Gang enabled in the Playhead Sync menu.
You can also use Up and Down arrow while the Viewer is highlighted.
So you can make quick adjustments to the filters as you cycle to each clip (per edit point so not each key press will go directly to a clip, but rather an edit point). The other thing to be aware of is if you have a cross-dissolve or something, while you progress through edit points the Canvas will just show the middle of the cross-dissolve and then move to the next edit point so mentally, you may miss a clip.
Bonus Tip: Since there are three keyboard commands for the Go to Next Edit command two of these are ready to be reassigned to something else if need be.
Thursday, November 19, 2009
Syncing Two Mics...after the fact

You know about sub-frame audio editing but let's say the audio has already been edited into your timeline and a re-edit isn't feasible.
FCP (as far as I know) has no simple way to adjust audio in the timeline in less-than-a-frame increments. If you adjust the In and Out points of an edited-in audio clip with Shift held down to alter it by a sub-frame it'll just adjust the length of the clip and reset the In point provided there's space available in the Timeline.
A handy way to get two mics that are ever so slightly out of sync into sync is to apply the AUSampleDelay audio filter to one of the audio clips.
Get your audio as close to synced as possible in the Timeline.
01) I like to turn off Snapping (tap the "n" key), then tap the "s" key for the Slip Tool.
02) Click on the audio clip that you want to get closer to being into sync and after you click and hold, hold down the Command key to enable more precise adjustments. Move your audio clip one frame to the left or the right (trial and error to see which sounds better).
03) Now, head over to Effects > Audio Filters > AUSampleDelay and add it to your clip. Then start adjusting the "in to out delay" number by increments of 1000 or so until your audio is pretty much in sync. This, again, will be some Trial and Error. (some prefer to call this Trial and Improvement...sigh)
What AUSampleDelay does is tell the audio of an audio clip it's applied to to hold it's horses for a little bit before it starts playing. So if the other mic's audio is running ahead of the second mic's audio, you can tell it to wait just a fraction of a second before it starts so they both start simultaneously.
Quick Tip: Hit Command + 5 to get Focus on the Effects Window, then hit Command + F and type in "AUSample" to quickly get to the filter.
Friday, October 3, 2008
Set Your Favorite Video Filter's Key Command

This one is quick and simple. If you use a filter regularly or just very often for a project you can set it up as a favorite filter with a specific key command. But, what's a little cooler is you can set your favorite filter to be the same key command all the time. The trick is after you drag a filter in your Effects window to your Favorites bin, rename it with a space before it's name so it's always listed at the top (in alphabetical order).
Now, that filter will always be Control + Shift + 2 even if you add more filters to your Favorites bin.
Saturday, October 13, 2007
Quick & Dirty Film Look for Final Cut
So you shot some footage that's clearly not looking anything like film but you want to make it look like film on the cheap and easy. Ok.
In the timeline:
01) Select the footage you want to have a pseudo-film look. If you want to apply this look to the entire sequence it's easier to Nest the timeline by selecting all and then tapping Option + C.
Then double up that footage above itself by making copy of it. The easiest way to do this is to click on the Nest or highlighted footage and hold down Shift + Option (shift makes it move straight up while option makes it copy) and drag it straight up. Let go of it and you'll have a copy above the original footage.
02) Bring down the Opacity of the upper track to 50%. You can either do this by highlighting the footage and loading it into the Viewer (if it's a nest, don't double click it to load it into the Viewer, just hightlight it and tap the Enter (not Return) key then in the Motion tab bring the Opacity slider to 50% or with the timeline window the frontmost one, tap Option + W to bring up the rubber bands on your clips/nest. Then drag the nests rubber band (in the video track) down until it's 50%.
03) Now, you have two video tracks of the same footage one atop the other with the upper one's opacity set to 50%. So head over to your effects window (Command + 5) and dig out the De-interlace filter. Drag it onto both nests/highlighted footage.
04) Load the upper video track into the Viewer and head to it's Filters tab. Set the De-Interlace filter to "Upper".
05) Load the lower video track into the Viewer and head to it's Filter's tab. Set it's De-interlace filter to "Lower".
06) This is optional depending on your footage but if you want you can toss a Gaussian Blur filter on the upper track and blur it ever so slightly. Try it and see if it makes it better or worse for your particular project.
07) Adjust any levels or contrast if you feel the need.
08) Render it out which may take a while depending on your system and quality of footage.
In the timeline:
01) Select the footage you want to have a pseudo-film look. If you want to apply this look to the entire sequence it's easier to Nest the timeline by selecting all and then tapping Option + C.
Then double up that footage above itself by making copy of it. The easiest way to do this is to click on the Nest or highlighted footage and hold down Shift + Option (shift makes it move straight up while option makes it copy) and drag it straight up. Let go of it and you'll have a copy above the original footage.
02) Bring down the Opacity of the upper track to 50%. You can either do this by highlighting the footage and loading it into the Viewer (if it's a nest, don't double click it to load it into the Viewer, just hightlight it and tap the Enter (not Return) key then in the Motion tab bring the Opacity slider to 50% or with the timeline window the frontmost one, tap Option + W to bring up the rubber bands on your clips/nest. Then drag the nests rubber band (in the video track) down until it's 50%.
03) Now, you have two video tracks of the same footage one atop the other with the upper one's opacity set to 50%. So head over to your effects window (Command + 5) and dig out the De-interlace filter. Drag it onto both nests/highlighted footage.
04) Load the upper video track into the Viewer and head to it's Filters tab. Set the De-Interlace filter to "Upper".
05) Load the lower video track into the Viewer and head to it's Filter's tab. Set it's De-interlace filter to "Lower".
06) This is optional depending on your footage but if you want you can toss a Gaussian Blur filter on the upper track and blur it ever so slightly. Try it and see if it makes it better or worse for your particular project.
07) Adjust any levels or contrast if you feel the need.
08) Render it out which may take a while depending on your system and quality of footage.
Thursday, September 27, 2007
Crappy 8mm Film Look
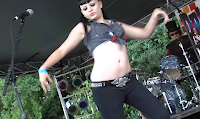
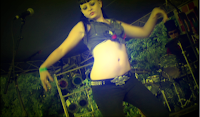
Here's a fast way to make your clean footage look more like old 70's 8mm footage.
From this:
To this:
01) Follow the simple vignette tutorial here.
02) In your Effects Bin find "Channel Blur" in Video Filters > Channel and drop that onto your clip.
03) In Channel Blur's settings try starting off with Alpha, Red & Green all set to 1.
04) Set Blue to 100.
This is a good starting point but feel free to play around with the settings until you get a look you like. Don't forget that if you get things too messed up just tap the Red X button in the filter's settings panel to reset it all to the defaults.
If you have a filmlook plug-in like CGM's Aged Film LE, you can add that now to further degrade the footage ;) Or you can try multiple filters like:
Video Filters > Video > Blink
Video FIlters > Stylize > Add Noise
Experiment!
From this:

To this:

01) Follow the simple vignette tutorial here.
02) In your Effects Bin find "Channel Blur" in Video Filters > Channel and drop that onto your clip.
03) In Channel Blur's settings try starting off with Alpha, Red & Green all set to 1.
04) Set Blue to 100.
This is a good starting point but feel free to play around with the settings until you get a look you like. Don't forget that if you get things too messed up just tap the Red X button in the filter's settings panel to reset it all to the defaults.
If you have a filmlook plug-in like CGM's Aged Film LE, you can add that now to further degrade the footage ;) Or you can try multiple filters like:
Video Filters > Video > Blink
Video FIlters > Stylize > Add Noise
Experiment!
Super Fast Vignette Effect

This one's pretty easy.
Video Generators > Shapes > Circle (or whichever you want)
01) Drop that over your clip.
02) 2nd click on the generator and in the contextual menu choose Composite Mode and select "Multiply".
03) Load the generator into the Viewer and under Controls set Size to 1% and Softness to 100%.
Done.
Subscribe to:
Posts (Atom)


 Posts
Posts

