
Back in 2009 (remember 2009? Your iPhone wasn't quite 3 years old yet and Slovakia just adopted the Euro) I reviewed a pretty spiffy piece of kit called the 8mm Distress Kit. Back then in the before-time™ it was in SD.
But, now, in the future world of today when your iPhone 4S shoots 1080HD footage the kit's gone Hi-Def, and only for a modest increase in price. What was then in then dollars was $35, is today, in today's dollars only $59.
In the virtual box you'll get 2 files which contain 28 clips sized at 1440x1080 running at 29.97 or 25fps if you swing that way.
The crazy thing is that this comes at the perfect time for me for a documentary that I've been working on for the past 86 years (well, it feels like 86 but if you want to get down to brass tacks, it's technically closer to 85) which involves super-8 footage and I wanted something to help me obtain some visual interest with some bland-talking-head interviews I've been handed which run the gamut from HD all the way down to SD DV tapes to even some (hold on to something) Flip footage. *gasp*
I think Mediapreview.net's HD 8mm Distress Kit is not only going to help make the documentary look like it cost more but I'll be able to invoice for more since it looks like it costs more which will make it cost more so it's all honest that way.
Check it out, give it a spin; there are some samples to play around with, a nifty little tutorial and more on their site. And with film going away, but people still having an intense interest in it's qualities (look at Instagram, lomography, me taking well over 11,000 photos with my nearly 8 year old cell phone just because they look "lo-fi" and cool), and the feature film Super-8, it looks like the super-8 look as well as the clean-slate innocence of that bygone time which accompanies it won't be forgotten soon.
It's funny; my assistant has never shot or touched film, never placed a needle on a phonograph record and has only seen 8-tracks on tv. He's never used a pay-phone or adjusted rabbit-ear antennas, either.
But there is something that speaks to us visually through the ages with film; there's a strange personal investment -or perhaps connection is a better word- in it when we see something shot on film, especially older formats like 8mm, super-8 and 9.5mm (look it up). There's some manner of ephemeral hypotactic permanence with it that digital just can't obtain. Sure digital is beautiful, the future and in many many ways better than film but the tangible hic et nunc of it is difficult for our minds to grasp; you have a pocketful of little digital cards or "files" tucked away in the dark recesses of a hard drive, unlike film where you can simultaneously see and hold history and memories and movement literally right in your hands...without needing any batteries.
Maybe it's the analog simplicity of it that encourages us to capture (and indeed slow down and notice) the simple things in life, and for that matter life itself. But then again, I'm old and have an 8 year old cell phone.
Give the kit a whirl and see how it changes the flavor of your footage, not just stylistically, but perceptually. To me it gifts digital footage with an import that it otherwise doesn't have. That's the language of film at work; that's why tilt-shifted footage looks miniature and in my mind and for my money, adding effects like what's in the distress kit makes footage as large as life.
Showing posts with label effects. Show all posts
Showing posts with label effects. Show all posts
Tuesday, October 18, 2011


Monday, July 25, 2011
The Telephone Voice Effect
I needed to do a quickie telephone effect to someone's voice in FCP and found this way was quick, simple and contained within FCP:
1. Apply the AUHipass filter to the audio clip. It's in Audio Filters > Apple
2. Set the cutoff frequency to between 1900 to 2000 and the resonance to about 18.
Keep in mind that these numbers are what worked for me. Your audio may need drastically different numbers.
1. Apply the AUHipass filter to the audio clip. It's in Audio Filters > Apple
2. Set the cutoff frequency to between 1900 to 2000 and the resonance to about 18.
Keep in mind that these numbers are what worked for me. Your audio may need drastically different numbers.
Tuesday, November 3, 2009
8mm Distress Kit Review
I had the opportunity to review Mediapreview's 8mm Distress Kit which is a $35 series of 28 clips to make your footage look like you shot it with your favorite Yashica 8-E III or Argus 8 back when 8mm meant split 16mm rather than 8mm video tapes.
What you get are two .mov files at 720x480 at 29.97fps. Every editor (and audience practically) is familiar with Artbeat's film looks so it's good to get some fresh material to work with and using them couldn't be simpler. Mediapreview has posted instructions here to help you out.
The first 60sec file has 14 clips strung together with numbers between each bit of footage so you can find one relatively quickly. My assistant thought that it would be easier to have them all as separate clips rather than two long files you have to shuttle through but I guess it's six of one really. I think it's simpler to scrub though two long clips rather than load up each one separately to find one that suits your needs. The second file has the other 14 clips and runs about 52 seconds.
The clips themselves run from leaders, mis-aligned, off-register, green keyed sprockets, dirty, grain, etc... but sadly, no burn throughs so this kit won't help you with your remake of Two-lane Blacktop. Another dificiency is the inclusion of just one dirty gate matte as item 13 on clip number 1.
However, the clips that are included are excellent at nailing that classic look of your old home movies or 1970's PSA's on PBS; they're really spot on. If you're out to re-create the healthy joys of Mulligan Stew in your backyard this kit is for you.
Basically, all you need to do is overlay the kit's clips atop your footage and choose an appropriate compositing method. I ended up using Screen a lot while playing around with the kit with some interesting and authentic results although stretching the clips to fit 16x9 footage to give it that 8mm look was pretty amusing.
For only $35, if you need that retro look and don't want to reuse the same clips that have been around for years, you really can't go wrong with Mediapreview's kit.
You can get some sample clips here and watch a demo here.
I'd like to see some more choices for mattes of dirty gates and some longer clips but the but the mood the material that is there already creates is pure authentic Radiant Screen ready fun. And yes, if you got all the references in this post you're old. Like me.
What you get are two .mov files at 720x480 at 29.97fps. Every editor (and audience practically) is familiar with Artbeat's film looks so it's good to get some fresh material to work with and using them couldn't be simpler. Mediapreview has posted instructions here to help you out.
The first 60sec file has 14 clips strung together with numbers between each bit of footage so you can find one relatively quickly. My assistant thought that it would be easier to have them all as separate clips rather than two long files you have to shuttle through but I guess it's six of one really. I think it's simpler to scrub though two long clips rather than load up each one separately to find one that suits your needs. The second file has the other 14 clips and runs about 52 seconds.
The clips themselves run from leaders, mis-aligned, off-register, green keyed sprockets, dirty, grain, etc... but sadly, no burn throughs so this kit won't help you with your remake of Two-lane Blacktop. Another dificiency is the inclusion of just one dirty gate matte as item 13 on clip number 1.
However, the clips that are included are excellent at nailing that classic look of your old home movies or 1970's PSA's on PBS; they're really spot on. If you're out to re-create the healthy joys of Mulligan Stew in your backyard this kit is for you.
Basically, all you need to do is overlay the kit's clips atop your footage and choose an appropriate compositing method. I ended up using Screen a lot while playing around with the kit with some interesting and authentic results although stretching the clips to fit 16x9 footage to give it that 8mm look was pretty amusing.
For only $35, if you need that retro look and don't want to reuse the same clips that have been around for years, you really can't go wrong with Mediapreview's kit.
You can get some sample clips here and watch a demo here.
I'd like to see some more choices for mattes of dirty gates and some longer clips but the but the mood the material that is there already creates is pure authentic Radiant Screen ready fun. And yes, if you got all the references in this post you're old. Like me.
Saturday, October 13, 2007
Quick & Dirty Film Look for Final Cut
So you shot some footage that's clearly not looking anything like film but you want to make it look like film on the cheap and easy. Ok.
In the timeline:
01) Select the footage you want to have a pseudo-film look. If you want to apply this look to the entire sequence it's easier to Nest the timeline by selecting all and then tapping Option + C.
Then double up that footage above itself by making copy of it. The easiest way to do this is to click on the Nest or highlighted footage and hold down Shift + Option (shift makes it move straight up while option makes it copy) and drag it straight up. Let go of it and you'll have a copy above the original footage.
02) Bring down the Opacity of the upper track to 50%. You can either do this by highlighting the footage and loading it into the Viewer (if it's a nest, don't double click it to load it into the Viewer, just hightlight it and tap the Enter (not Return) key then in the Motion tab bring the Opacity slider to 50% or with the timeline window the frontmost one, tap Option + W to bring up the rubber bands on your clips/nest. Then drag the nests rubber band (in the video track) down until it's 50%.
03) Now, you have two video tracks of the same footage one atop the other with the upper one's opacity set to 50%. So head over to your effects window (Command + 5) and dig out the De-interlace filter. Drag it onto both nests/highlighted footage.
04) Load the upper video track into the Viewer and head to it's Filters tab. Set the De-Interlace filter to "Upper".
05) Load the lower video track into the Viewer and head to it's Filter's tab. Set it's De-interlace filter to "Lower".
06) This is optional depending on your footage but if you want you can toss a Gaussian Blur filter on the upper track and blur it ever so slightly. Try it and see if it makes it better or worse for your particular project.
07) Adjust any levels or contrast if you feel the need.
08) Render it out which may take a while depending on your system and quality of footage.
In the timeline:
01) Select the footage you want to have a pseudo-film look. If you want to apply this look to the entire sequence it's easier to Nest the timeline by selecting all and then tapping Option + C.
Then double up that footage above itself by making copy of it. The easiest way to do this is to click on the Nest or highlighted footage and hold down Shift + Option (shift makes it move straight up while option makes it copy) and drag it straight up. Let go of it and you'll have a copy above the original footage.
02) Bring down the Opacity of the upper track to 50%. You can either do this by highlighting the footage and loading it into the Viewer (if it's a nest, don't double click it to load it into the Viewer, just hightlight it and tap the Enter (not Return) key then in the Motion tab bring the Opacity slider to 50% or with the timeline window the frontmost one, tap Option + W to bring up the rubber bands on your clips/nest. Then drag the nests rubber band (in the video track) down until it's 50%.
03) Now, you have two video tracks of the same footage one atop the other with the upper one's opacity set to 50%. So head over to your effects window (Command + 5) and dig out the De-interlace filter. Drag it onto both nests/highlighted footage.
04) Load the upper video track into the Viewer and head to it's Filters tab. Set the De-Interlace filter to "Upper".
05) Load the lower video track into the Viewer and head to it's Filter's tab. Set it's De-interlace filter to "Lower".
06) This is optional depending on your footage but if you want you can toss a Gaussian Blur filter on the upper track and blur it ever so slightly. Try it and see if it makes it better or worse for your particular project.
07) Adjust any levels or contrast if you feel the need.
08) Render it out which may take a while depending on your system and quality of footage.
Thursday, September 27, 2007
Crappy 8mm Film Look
Here's a fast way to make your clean footage look more like old 70's 8mm footage.
From this:
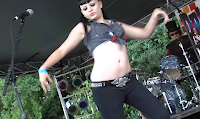
To this:
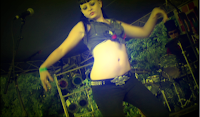
01) Follow the simple vignette tutorial here.
02) In your Effects Bin find "Channel Blur" in Video Filters > Channel and drop that onto your clip.
03) In Channel Blur's settings try starting off with Alpha, Red & Green all set to 1.
04) Set Blue to 100.
This is a good starting point but feel free to play around with the settings until you get a look you like. Don't forget that if you get things too messed up just tap the Red X button in the filter's settings panel to reset it all to the defaults.
If you have a filmlook plug-in like CGM's Aged Film LE, you can add that now to further degrade the footage ;) Or you can try multiple filters like:
Video Filters > Video > Blink
Video FIlters > Stylize > Add Noise
Experiment!
From this:

To this:

01) Follow the simple vignette tutorial here.
02) In your Effects Bin find "Channel Blur" in Video Filters > Channel and drop that onto your clip.
03) In Channel Blur's settings try starting off with Alpha, Red & Green all set to 1.
04) Set Blue to 100.
This is a good starting point but feel free to play around with the settings until you get a look you like. Don't forget that if you get things too messed up just tap the Red X button in the filter's settings panel to reset it all to the defaults.
If you have a filmlook plug-in like CGM's Aged Film LE, you can add that now to further degrade the footage ;) Or you can try multiple filters like:
Video Filters > Video > Blink
Video FIlters > Stylize > Add Noise
Experiment!
Super Fast Vignette Effect

This one's pretty easy.
Video Generators > Shapes > Circle (or whichever you want)
01) Drop that over your clip.
02) 2nd click on the generator and in the contextual menu choose Composite Mode and select "Multiply".
03) Load the generator into the Viewer and under Controls set Size to 1% and Softness to 100%.
Done.
Sunday, September 23, 2007
Subscribe to:
Posts (Atom)


 Posts
Posts

