Here's a quick and dirty way to add subtitles to a Final Cut Pro project.
01) Create two new upper video tracks.
02) On track under the top-most one drop in a Color Solid, hit the "C" key and crop it to the lower third area. Color it gray, bring the Opacity to about 50% and stretch it out and repeat it so it's the length of your project.
03) On the top most track drop in a text element. Configure your text to something very legible like Arial Black and color it bright yellow. Add a "1" drop shadow to give it some extra clarity. Stretch it out and repeat it so it's the length of your project. From the Viewer drag it to your Browser and Save the Project so you'll have it as a template in case you need it later on.
04) Now, play through your project and with the Blade Tool (tap B) and your finger on the space bar stop playback at the end of each sentence and click with the cursor to snip the text elements so there's one element per sentence.
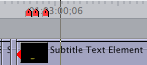
I thought up another way to break up the text elements. If you lock all the other tracks (video and audio) [Option + Click on the subtitle's text layer to lock all video tracks but that one, then lock all the audio tracks] then hit Control + V after each sentence while the video is playing, you'll add edits to the text elements. They won't show up until you tap the spacebar however but they'll be there. In fact, you'll see RED markers in the timeline which you've probably never seen before :)
05) Get your script or transcript and open it in your text editor. Do a Find and Replace and tell it to find "." (a period) and replace it with ". " (a period and an Option + Return) This will break up the script into easily copied sentences.
06) In FCP close your effects window and the browser window (Command + 5 and Command + 4) and position the script under FCP so you can see it and get to it with a click.
07) In FCP in the Canvas at the top set the middle pull down menu to "Open" so your Viewer will automatically open the text element that your playhead is over in the Timeline.
08) Now that your text element is broken up and pre-configured for legibility, position your playhead over the first text element that represents the first sentence. Then click in the word processor and copy a sentence. Then click on the Viewer window (tap the Control tab if it's not ready for you to paste into the text entry box) and paste in that sentence. Size and position that sentence so it looks nice.
09) Go back to the word processor and copy the next sentence. Click on FCP and position the playhead over the next text element, see how the Viewer automatically shows you that one? That saves you having to tap Enter or Double Click the text element to load it into the Viewer. It's done automatically for you.
10) Wash, Rince & Repeat. And don't forget to save.
Some other options are software based such as:
UniSay (Windows only) and
MacCaption. I haven't tried either one though.
Here's an interesting tip:
If you have a .srt or .sub subtitle file in the same folder as a Quicktime movie and open the Quicktime movie the subtitles are loaded, but if you also have
Perian loaded and then
Save As... the QuickTime movie, the subtitles will be saved into it. I haven't tested this yet but it sounds promising. It's essentially what
Submerge does only for free (if it works).
If you have any other ideas, hints or tips about subtitles lemme know and we'll post them here.


 Posts
Posts

