
Here's a handy FREE app to convert Audio pretty painlessly.
MediaHuman Audio Converter
It's pretty straight forward in use. Drag audio files in, set output format and hit go.
Don't forget to head to preferences and set it's output destination to someplace you'd like first. I set it to source folder, the default is in iTunes' music folder.
Showing posts with label audio. Show all posts
Showing posts with label audio. Show all posts
Saturday, June 21, 2014
Friday, June 29, 2012
H4N Zoom Slow to Start Recording
Although not a FCP tip here's something I noticed today that may save people's sanity on-set. On an H4N Zoom audio recorder, after a while tapping the REC button will take a long long time to begin monitoring audio, and sometimes it'll go straight to recording (this is with Firmware 1.72).
The solution I discovered was to simply tell it to record into an empty folder. That seems to eliminate the excruciatingly long pause before it starts rolling.
There must be some sort of file or file-tree check before it begins writing or thinking about writing to a card with many files on it. Today was with a Class 10 card so it's likely not a speed issue. My guess is somewhere around 100+ files causes a slow down to turn on monitoring/recording.
So by recording to an empty folder there's no file-tree to check and it goes right to monitoring/recording. New rule: New Day - New Folder.
Tuesday, April 10, 2012
Quick Access to Audio Inputs and Outputs
Often I use a USB microphone for quick Voice Overs (for timing) and when I'm on the road I tend to just hook up my Zoom H4N to the laptop and record comments and VO's using it directly into FCP or Quicktime 7.
If you hold down Option while clicking on the volume adjustment menubar item you'll see this:

Instead of the normal volume slider. This is a quick way to access these common settings and get to the the Sound Preferences.
Bonus Tip:
Hitting Option + Volume Up or Down will also take you directly to the Sound panel in Settings.
If you hold down Option while clicking on the volume adjustment menubar item you'll see this:
Instead of the normal volume slider. This is a quick way to access these common settings and get to the the Sound Preferences.
Bonus Tip:
Hitting Option + Volume Up or Down will also take you directly to the Sound panel in Settings.
Tuesday, March 6, 2012
Pasting Negative Infinity
In the Level setting for audio in the Viewer you can type in all sorts of values to change the level of your audio. But you really can't type in "-inf" if you want the audio from certain channels gone completely while you monitor playback.
But you can drag the slider all the way to the left to "-inf", then highlight and copy (Command + C) then while it's on your clipboard you can paste it (Command+V) into other clip's channel's level settings.
When you paste it into a Textedit document set to plain text, you'll even see that it's "-inf", yet you can't type letters into this box in Final Cut Pro. Weird.
 |
| Copy Negative Infinity, then Paste Negative Infinity in spite of ram limitations! |
Wednesday, January 11, 2012
How to convert a single audio file to separate ones with a .cue file
A client sent me a link to their FTP server of a VO for a project I'm cutting. It turns out that whatever place they used to record the VO, I guess, just left their equipment recording while the VO talent read the script.
Meaning, it's one giant 400 MB .Flac file.
A, why they sent it as a .Flac file is beyond me.
B, why it's one large file is equally beyond me other than they literally never hit pause during the entire recording session, which is exactly what it sounds like they did.
Hearing the client "direct" the professional voice over talent is priceless btw…
But, at least they provided a .cue file.
Seriously. I know.
So my task was to either complain and loose my job and sanity -imagine trying to explain .flac, .mp3 and .cue files to a client- or just find a way to break them up myself.
One solution would be to dump the audio into Final Cut and just Control + V at all the gaps or actually listen to it all and copy paste into new timelines or make subclips or something else equally archaic. Another way was to use an app to cut the audio when it encounters silence but that would likely lead to it cutting at pauses in long sentences.
It turns out it's easier than I had thought. First off Toast won't due it easily (if at all) which was my first thought and attempt. I didn't make much progress with it -it seems the more Toast is updated the more confused it becomes as to what it's main function is- but I did remember a cool little free app called Max that I had used a long time ago so I did what I usually do when awakening an old app…look for any updates first.
Looking at some software sites I saw that Max hadn't been updated in a while but as a "related" search item I saw the FREE app XLD which is an acronym for "X Lossless Decoder" which I knew of but never had much use for outside of the odd conversion.
Now, while Max would likely work I decided to try XLD because it was more recently updated, by a lot.
What you need to do to break up a single file into separate audio files using a provided .cue file (technically you could make your own) is this:
1. Drag your .cue file onto XLD. It'll launch.
2. After XLD's window appears look at the left column. There you'll see the main recording. Make sure it's highlighted and active and you'll see the list of individual tracks on the right in the main window.
3. Hit Command + Comma for XLD's preferences.
4. In the Preferences window select the Output Format you want (double check the Options button if you need precise control of the output format, say for like a TV station or something), then set the Output Directory to where ever you'd like it. You can also set things like the format of the file name and the Maximum number of Threads here. Close the Preferences window.
5. Back in the main window hit the Transcode button and away you go.
Monday, August 8, 2011
DVCHDPROAudio.plugin Console Error
I'm sure you've seen it if you've ever launched your Console and looked at All Messages. Something like:
8/8/11 12:50:03 AM Mail[212] Error loading /Library/Audio/Plug-Ins/HAL/DVCPROHDAudio.plugin/Contents/MacOS/DVCPROHDAudio: dlopen(/Library/Audio/Plug-Ins/HAL/DVCPROHDAudio.plugin/Contents/MacOS/DVCPROHDAudio, 262): no suitable image found. Did find:
/Library/Audio/Plug-Ins/HAL/DVCPROHDAudio.plugin/Contents/MacOS/DVCPROHDAudio: no matching architecture in universal wrapper
You'll see it for VLC, Mail, loginwindow, SustemUIServer, UserEventAgent and a bunch of other stuff.
You don't need it. Or at the very least, it's highly unlikely you'll need it.
So what to do? Since Apple has never really clarified what's going on here and it's a LONG STANDING bug/error/incompatibility and older versions can't even load on Intel machines (there is a universal version from 2007 of the plugin) I went to where it was, zipped it, trashed the original and left the zip file sitting there.
It's located in /Library/Audio/Plug-Ins/HAL
What is this thing anyway, you ask?
I think it's a USB driver for 1:1 audio connections that apps like Reason, Audacity, Cubase and Logic use; or at least used to.
If you want to poke around the file you can take a look at it in the Terminal: copy and paste in:
ls -IR /Library/Audio/Plug-Ins/HAL/DVCPROHDAudio.plugin
and you'll see some helpful-ish information:
drwxrwxr-x 6 root admin 204 Apr 20 2007 Contents
/Library/Audio/Plug-Ins/HAL/DVCPROHDAudio.plugin/Contents:
total 24
-rw-rw-r-- 1 root admin 1258 Mar 30 2007 Info.plist
drwxrwxr-x 3 root admin 102 Apr 20 2007 MacOS
-rw-rw-r-- 1 root admin 9 Mar 30 2007 PkgInfo
-rw-rw-r-- 1 root admin 514 Apr 20 2007 version.plist
/Library/Audio/Plug-Ins/HAL/DVCPROHDAudio.plugin/Contents/MacOS:
total 2456
-rwxrwxr-x 1 root admin 1254748 Mar 30 2007 DVCPROHDAudio
So it's not a permission's issue.
Then you can try: (again, copy and paste into the Terminal)
file /Library/Audio/Plug-Ins/HAL/DVCPROHDAudio.plugin/Contents/MacOS/DVCPROHDAudio
and you'll see some slightly more helpful things like:
/Library/Audio/Plug-Ins/HAL/DVCPROHDAudio.plugin/Contents/MacOS/DVCPROHDAudio: Mach-O universal binary with 2 architectures
/Library/Audio/Plug-Ins/HAL/DVCPROHDAudio.plugin/Contents/MacOS/DVCPROHDAudio (for architecture ppc): Mach-O bundle ppc
/Library/Audio/Plug-Ins/HAL/DVCPROHDAudio.plugin/Contents/MacOS/DVCPROHDAudio (for architecture i386): Mach-O bundle i386
So, hey, at least the version you may or may not have is Universal.
And you can even right-click on it and Show Package Contents and dig around. You can open the DVCPROHDAudio file in Contents/MacOS with something like Hex Fiend and confirm that it's an audio driver for some obscure and some fairly outdated stuff.
Bottom line is you'll know if you need it. If you don't know, then you don't need it and likely never will. For my system it seems okay to zip the original package in the HAL folder and trash the original plug-in. This way it won't load (because it's not a .plugin file) and should the occasion arise when you do need it, just double click it to unzip it right where it needs to be.
Tuesday, June 28, 2011
AudioCapture - Another Audio Recording App
There are myriad audio recording apps for the Mac now. Some are (kinda) built in like Quicktime Pro's "New Audio Recording" and some are expensive like Final Cut Studio's ability to record directly into Soundtrack Pro and Final Cut Pro.
A new FREE audio recorder is AudioCapture [app store link] It records to these formats:

But it does so as a .mov which while not a deal breaker is a bit of a hassle. Still, it's free.
A new FREE audio recorder is AudioCapture [app store link] It records to these formats:
But it does so as a .mov which while not a deal breaker is a bit of a hassle. Still, it's free.
Friday, May 6, 2011
Equalizing Audio Levels in Soundtrack Pro
A buddy of mine is working on a short film and needs lots and lots of "ambient location soundscapes" (his term :) and a few of the recordings have wildly different volume levels.
For example one recording is a person whispering between bouts of a person yelling a speech and thunderous applause. Yeah, I know; could you get any worse for post-production? Well, I did have a client once ask me if I had a "color filter" and I was like, "Yeah?" because we do but they meant something that turns black and white footage into color. I just told them yes (always say yes) but that it's VERY VERY EXPENSIVE (always say it's prohibitively expensive when you want to say no).
So, not really sure what my friend wanted this little bit of audio to sound like because they didn't either I tossed it into Soundtrack Pro, removed the background hiss/AC Unit/whatever it is via a noise print, and then used the Compressor filter.
It looks like this:

It's under Process >Dynamics I think and what this little HUD does is basically, bring up low levels and bring down high (or loud) levels.
Set the Limiter Threshold to something like -6 or -3dB (don't forget to tick the blue box to activate this slider), monkey with the Gain so overall it's at a level you like and generally bring up the Compressor Threshold a bit to clear out some background noise.
Now, some audio people are undoubtedly reading this with one eyebrow raised but yes, I know what all this stuff does but this is Quick Fix Post Friday Madness.
See the little play button to the left of the volume slider? To the right of that slider is a preview button of sorts which will toggle the audio playback with and without this filter applied so you can see if you're making things sound worse or better; it's easy to mess with stuff so much and lose track of just how much you've changed things from the original.
Hit Apply to apply.
You'll see all sorts of fun adjustments happening and when I was done with this bit of audio the whispers were loud enough to hear but not overbearing, the applause was now less room rattling and a bit of the background hum was removed as well.
Sometimes on some systems there's a bit of a nasty bug with some of these effects. Occasionally you'll hit playback to see what your changes sound like and the resultant audio will be full volume and screeching from distortion. I don't know why. A few times toggling the play button usually resolves it, I'm told.
Thursday, March 17, 2011
Quickly Editing Scratch Track Voice Overs
Sometimes you don't have the professional VO talent yet so you lay down a scratch track VO to rough the edit to. When doing long projects like this I've gotten into the habit of listening to the scratch track VO at 2x speed (Tap the L key twice) so running through them and cutting out the mistakes takes a lot less time.
And since it's a scratch track it's not terribly important or worth taking too much time on. For me (and likely for you) the scratch track is just a reference VO to get shots in order and very roughly timed in.
FCP has some pretty decent scrubbing abilities (Unlike Audacity…still) so use them to shorten some of the time spent with stuff like this.
Keep the script in front of you and follow along and you shouldn't have too much trouble keeping up at 2x speed; just remember to listen for long pauses (which will be shortened relatively), mistakes and all that fun stuff…like sneezes.
Wednesday, March 16, 2011
Using A Zoom H4n To Record Directly Into Final Cut Pro
You probably already have or at least know about Zoom's H4n. It shows up on lots of indie films and industrials now days. I have one I love and use pretty often for VOs.

A friend was surprised when I showed them how you can use the H4n to record directly into Final Cut Pro using the (Option + 0) -that's a zero- Voice Over tool.
1. Set up Final Cut so you're ready to record the VO.
2. Plug in the H4n using a USB cable.
3. THEN turn it on. (you can plug in the USB cable and select it after, but it's likely your H4n is off to begin with)
Note: the H4n may turn on automatically when you plug in the USB cable. There's an issue here that you may run into and should be aware of: if you hear a whine noise or some how unclean audio try plugging the H4n into it's AC power THEN turn it on, THEN plug in the USB cable and then go to Menu > Audio I/F > Connect. Don't forget to select your Frequency if you need to.
4. Select "Audio I/F"
4. Choose your kHz.
5. Select "Connect".
6. In FCP hit Option + 0 to open the VO Tool window.
7. Under "Source" select "H4".
8. In your TimeLine set an In and Out point for the VO
(NO you don't need to lay video slugs down to record VO…although that works as well, my friend's method, btw)
9. Hit record in the VO Tool window.
BONUS TIP:
If you want to use your H4n to record directly into Audacity, say on a laptop that can't run FCP or something, you need to first go to Audacity's preferences and go to Devices > Recording > Device then select "H4" there then hit Ok.
You can also select the H4n as a playback device if needed, routing audio from the Mac to the H4n.
Thursday, February 17, 2011
Ripping Audio from Flash Video Files (.flv)
An interesting hint showed up on macosxhints.com on Wednesday with all manners of ways to extract audio from an .flv. which means I get to write a nice long wall-of-text TLDR post while I sip coffee.
One method not mentioned is simply to use something like Click2Flash (you can also get it as a Safari extension here) and set it's prefs to allow downloading of the .flv which will have the added convenience of downloading the video as an H.264 if the site hosting the video supports that. Extracting the audio from the H.264 is straightforward after that.
Once you do download a vanilla .flv though you very well may find that VisualHub can't convert it to anything (*cries a little*), so you need to try some other options like this one. If it's a .swf you can try this.
TIP ON DOWNLOADING THE VIDEO FILE:
An easy built-in way is to find it in the Activity Window (Command + Option + A) of Safari and Option-Double-Click it.
Macosxhints' hint + comments can be broken down into this list of methods.
Using VLC:
01) Open it in VLC.
02) Hit Shift+Command+W to open the "Streaming/Export Wizard" window.
03) Hit the "Transcode/Save to file" Radio Button.
04) Hit "Next" (Return)
05) Hit the "Existing playlist item" Radio Button.
06) Select the file to extract the audio from, from the list.
07) Hit "Next" (Return)
08) Tick the "Transcode audio" tick box.
09) For the Codec Pulldown select FLAC (you can really choose whatever is best for you here depending on your needs, Uncompressed may be quite useful.)
10) Hit "Next" (Return)
11) Confirm "RAW" is selected.
12) Hit "Next" (Return)
13) Choose... where to save the file file to.
14) Open the saved audio file in whatever audio editing tool you enjoy. The hint suggests Audacity.
ALL-IN-ONE-SOLUTIONS:
- Use iExtractMP3. FREE. (Didn't try because it's last update was 12-05-08)
- Use RichFLV. FREE. (Didn't try it because it requires Adobe Air)
- Use ffmpegX. FREE. (You very likely already have this installed. It's a bit out of date though)
- Use SWFTools. FREE. (Installing is a bit complex and using the app itself is a little tricky)
- Use Miro Video Converter. FREE. (I've mentioned this one before. Can occasionally be handy, check it out.)
- Use Browser Extentions. (There are too many to list here)
- Use FLV Crunch. FREE (If you haven't tried this app you should give it a whirl)
- Use MediaConverter.org. FREE (It's a website that does conversion for you. I haven't used it much)
Using QuickTimeX and QuickTime Player 7:
01) Open it in QTX. (ymmv)
02) Export it to something QT7 can open.
03) Open it in QT7 and Export... it as audio. (Export Sound to AIFF or whatever your choice is)
04) Optionally, use the semi-hidden Extract audio function: With movie open hit Command + J for the Properties Window, click on the "Sound Track" you want, tap the Extract button at the top left of the window and then Save As... or Export... the resultant window to whatever you fancy. Notice the dot in the center of the close window widget, that means it's not saved.
Using FFMPEG:
00) Install FFMPEG (likely you already have this installed if you read this blog)
01) Fire up the Terminal and enter:
ffmpeg -i yourFLVfile.flv -acodec copy namethissomething.mp3
You can drag the file to be transcoded into the Terminal to find it's path. Likewise, you can drag the folder you want it outputted (that's a word?) into the Termainal as well to set the path to it.
Type: ffmpeg -i
Hit space bar
Drag in file to be transcoded
Hit space bar
Type: -acodec copy
Hit space bar
Drag in location for output file.
Hit Return.
You can really do this with most files, not only .flv's, btw.
Using Handbrake:
01) Open the file in Handbrake (ymmv).
02) Export it as .mp4.
03) Extract it with QuickTime Player 7 (or even Garageband if you don't have QT7 installed or whatever app you like.) People tend to forget Garageband can do some neat stuff with audio.
Using TubeTV and Switch (free version):
I haven't tried this method not just because TubeTV is old (circa 2008) but mainly because other methods are simpler and have more options. I didn't like this line at TubeTV's site: "High quality video conversions using the H.264 codec are performed with QuickTime® and Perian." Why not just use Perian then to begin with?
TubeTV is here.
Free version of Switch is here.
Using MPEG Streamclip: (thanks to reader "andthatallthereistoit")
01) Open the .flv in MPEGStream Clip. (ymmv depending on the type of .flv)
02) File > Export Audio.
03) Done!
One method not mentioned is simply to use something like Click2Flash (you can also get it as a Safari extension here) and set it's prefs to allow downloading of the .flv which will have the added convenience of downloading the video as an H.264 if the site hosting the video supports that. Extracting the audio from the H.264 is straightforward after that.
Once you do download a vanilla .flv though you very well may find that VisualHub can't convert it to anything (*cries a little*), so you need to try some other options like this one. If it's a .swf you can try this.
TIP ON DOWNLOADING THE VIDEO FILE:
An easy built-in way is to find it in the Activity Window (Command + Option + A) of Safari and Option-Double-Click it.
Macosxhints' hint + comments can be broken down into this list of methods.
Using VLC:
01) Open it in VLC.
02) Hit Shift+Command+W to open the "Streaming/Export Wizard" window.
03) Hit the "Transcode/Save to file" Radio Button.
04) Hit "Next" (Return)
05) Hit the "Existing playlist item" Radio Button.
06) Select the file to extract the audio from, from the list.
07) Hit "Next" (Return)
08) Tick the "Transcode audio" tick box.
09) For the Codec Pulldown select FLAC (you can really choose whatever is best for you here depending on your needs, Uncompressed may be quite useful.)
10) Hit "Next" (Return)
11) Confirm "RAW" is selected.
12) Hit "Next" (Return)
13) Choose... where to save the file file to.
14) Open the saved audio file in whatever audio editing tool you enjoy. The hint suggests Audacity.
ALL-IN-ONE-SOLUTIONS:
- Use iExtractMP3. FREE. (Didn't try because it's last update was 12-05-08)
- Use RichFLV. FREE. (Didn't try it because it requires Adobe Air)
- Use ffmpegX. FREE. (You very likely already have this installed. It's a bit out of date though)
- Use SWFTools. FREE. (Installing is a bit complex and using the app itself is a little tricky)
- Use Miro Video Converter. FREE. (I've mentioned this one before. Can occasionally be handy, check it out.)
- Use Browser Extentions. (There are too many to list here)
- Use FLV Crunch. FREE (If you haven't tried this app you should give it a whirl)
- Use MediaConverter.org. FREE (It's a website that does conversion for you. I haven't used it much)
Using QuickTimeX and QuickTime Player 7:
01) Open it in QTX. (ymmv)
02) Export it to something QT7 can open.
03) Open it in QT7 and Export... it as audio. (Export Sound to AIFF or whatever your choice is)
04) Optionally, use the semi-hidden Extract audio function: With movie open hit Command + J for the Properties Window, click on the "Sound Track" you want, tap the Extract button at the top left of the window and then Save As... or Export... the resultant window to whatever you fancy. Notice the dot in the center of the close window widget, that means it's not saved.
Using FFMPEG:
(Terminal Madness Alert!)
00) Install FFMPEG (likely you already have this installed if you read this blog)
01) Fire up the Terminal and enter:
ffmpeg -i yourFLVfile.flv -acodec copy namethissomething.mp3
You can drag the file to be transcoded into the Terminal to find it's path. Likewise, you can drag the folder you want it outputted (that's a word?) into the Termainal as well to set the path to it.
Type: ffmpeg -i
Hit space bar
Drag in file to be transcoded
Hit space bar
Type: -acodec copy
Hit space bar
Drag in location for output file.
Hit Return.
You can really do this with most files, not only .flv's, btw.
Using Handbrake:
01) Open the file in Handbrake (ymmv).
02) Export it as .mp4.
03) Extract it with QuickTime Player 7 (or even Garageband if you don't have QT7 installed or whatever app you like.) People tend to forget Garageband can do some neat stuff with audio.
Using TubeTV and Switch (free version):
I haven't tried this method not just because TubeTV is old (circa 2008) but mainly because other methods are simpler and have more options. I didn't like this line at TubeTV's site: "High quality video conversions using the H.264 codec are performed with QuickTime® and Perian." Why not just use Perian then to begin with?
TubeTV is here.
Free version of Switch is here.
Using MPEG Streamclip: (thanks to reader "andthatallthereistoit")
01) Open the .flv in MPEGStream Clip. (ymmv depending on the type of .flv)
02) File > Export Audio.
03) Done!
Thursday, January 20, 2011
Audio Out of Phase
Without getting too much into the details as they're complex and vast sometimes (eventually) you'll receive audio that is out of phase, likely 180°, if the audio sounds like it was recorded with the mic in a plastic bucket. Another clue is that it'll sound okay when played back from whatever it was recorded on but be very low volume when played back in Final Cut Pro.
There are myriad ways this can happen but the most common is that the audio was recorded on two separate mic's that were improperly spaced apart so the audio they're recording reaches one mic later than the other and causes a comb filter effect.
One way I've experienced this is when on set someone has the brilliant idea of setting up a "back-up" mic close to but not along side the main mic's and rather than helpfully recording it to a separate channel they mix it in with the the main audio feed. I cringe when someone tells me they have "reference" audio as well on a multi-camera shoot because there's the risk the audio guy (or girl) mixed it all down.
One particularly bad case was when someone mixed in an off-camera (and off-set) "back-up reference" shotgun mic on a c-stand along with a TV host's lav. I know!
The out-of-phase audio you can monkey with is when there are two mic's recording the same audio source but those mic's are placed at unequal distances from that audio source and they're recorded to separate channels. Audio bouncing off a nearby wall or something into one mic can cause a similar problem.
The basic result is that one audio channel is canceling out the other (sorta, it's really just reducing the amplitude). The peaks of one meet the troughs of the other's waveform thereby reducing the clarity and volume of the audio. This page has some good visuals explaining it. You can get an idea of the effect by reversing the leads to one speaker on a stereo and playing a VO (Voice Over); it'll sound "funny".
Final Cut Pro doesn't have a way to fix this readily, but one quick check for phased audio (and a fix kinda) is to simply turn off one channel and listen to it to see if it sounds better. If it does: the audio sounds brighter, louder, clearer, it's likely the audio was recorded out of phase.
A quick fix (meaning if the client is there waiting when the audio sounded great when played back on their camera through headphones) is to turn off one of the channels, duplicate the one remaining above or below itself, and then adjust the audio level a bit. It'll be in mono but you can fake that by offsetting the duplicated channel by a few hundredths of a frame (in the Viewer via moving the In point while you hold down SHIFT).
I may post more about this later in greater detail but I thought I'd mention this since if it pops up it can be pretty flummoxing if you've never seen (heard?) it before.
Thursday, July 29, 2010
Clients and Peak Meters
 Sometimes Clients insist on audio being louder, especially when you have background music with some VO (Voice Over). However, they have no idea with the audio meters mean and have no concept of what db means or why it's shown as a negative. Let alone trying to tell then why peaking is a bad bad thing.
They just like it all LOUD ENOUGH TO HEAR.
Here's what I do. When I know the audio is correct, the voice is around -6 or so, the music is (depending on the project) -12 or -20ish and they want to hear it LOUDER! I CAN'T HEAR IT! I quietly hold down SHIFT and nudge the Mac's audio up with the Increase Volume Key.
Shift will mute, while held down, the plonk noise of increasing or decreasing the audio.
They think the audio is now louder (I always try to keep my edit bays Mac's audio at at least two below maximum) and you won't have audio that needlessly peaks.
Another fun Audio volume trick is to hold down SHIFT + OPTION while you adjust the volume which lets you adjust the volume in 1/4 increments per visual block. I'm not sure if you can mute it while doing this though.
Monday, June 7, 2010
Adobe Audition on Mac
Someone has posted a video on Youtube that's causing some debate. It looks like Adobe Audition running on a Mac, which if true, and it is eventually released, would be very interesting. I think a lot of users may abandon Pro-Tools if the price point is low enough.
Of course if it's not ever officially released and isn't VMWare or something, I suspect that we'll start seeing many beta versions of this running in studios like some other bits of software that were never officially released and are used professionally even though they're pretty buggy. You know who I'm talking about.
Of course if it's not ever officially released and isn't VMWare or something, I suspect that we'll start seeing many beta versions of this running in studios like some other bits of software that were never officially released and are used professionally even though they're pretty buggy. You know who I'm talking about.
Monday, February 22, 2010
Audio Playback Patch Causing FireWire Audio Noise?
Some people are reporting a high pitched noise after the audio fix update.
You can read the thread here.
So the recent Mac Pro audio update 1.0 (applied on 10.6.2) has reduced my CPU temperature with audio playback (Presonus Firebox Firewire audio interface) and that is great. Also haven't had any machine crashes (grey screens) recently which is also great.
The problem is that when the Firebox is plugged into the firewire port of the Mac Pro there is a constant high pitched whistle of slightly oscillating frequency. If I unplug the Firebox the whistle goes away in a few seconds.
After prolonged use in a quiet room (the kind of room you need for audio recording / mixing work!) the noise is enough to drive me crazy.
You can read the thread here.
Tuesday, January 19, 2010
Ripping just Audio from DVDs
Mac OS X Hints has an interesting post about how to rip just the audio from DVDs. I've only really had to do this a couple of time, but when I get a chance I'm going to test out some new methods.
They cite this method, which uses Mac The Ripper to rip the AC3 audio and then ffmpegx to transcode it to mp3, but the apps are a bit long in the tooth (ffmpegx's last update was January 26th 2008) or a bit tricky to get a copy of a recent version.
An alternate to ffmpegx is MAC3dec but that's a bit of an old app as well. Apparently last updated on August 26th 2004.
Mpeg Streamclip is probably the best way to go that I've seen so far.
(Yes there's OSex but it's pretty old.)
Tuesday, January 5, 2010
The Sounds of a Dying Hard Drive

Ever wonder what a hard drive sounds like when it dies? If you've never heard it scream before here's your chance.
These are two sound files of a dying hard drive an editing place has. This hard drive is so bad that it's way beyond Disk Utility's help.
Sorry they're .zip files at a free hosting site, but they didn't want people streaming them over and over, and embedding them from their server.
83K - The idle sound of the dying hard drive. Download Link.
2.23MBs - The HD tries to read data, gives up, coughs and chokes, then kinda just gives up. Download Link.
Make sure your speakers aren't too loud as some of the sounds are pretty harsh and somewhat loud.
Sunday, December 13, 2009
Audio Waveforms Only Display When Zoomed
In FCP 6.0.6 I've mentioned the audio waveform display bug before, but here's a new twist to an old problem.
In the Timeline one set of audio will display the waveform while another one won't. They're identical as far as I can see and in fact, were recorded at the same time only on two separate yet identical cameras.
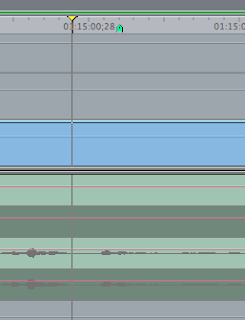
That's what it looks like in the Timeline. The upper channels are flatlined, but if you load that audio clip into the Viewer you'll see something like this:
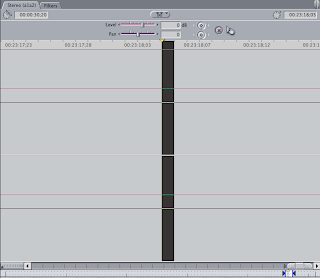
Now, if you zoom in one more iteration you'll see the waveform:
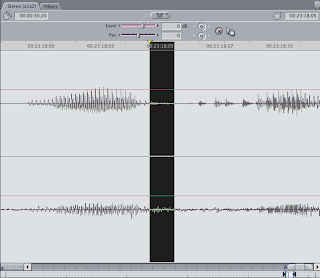
Most of the time quitting and relaunching FCP (6.0.6) will clear this up but not always. Trashing the waveform cache can help as well but it's not a 100% guaranteed fix.
AUgraphicEQ's Battle of the Bands

I've never been able to get the AUgraphicEQ audio filter's 10 Band setting to work. It's either a bug or something I'm unaware of. When I set the pull-down to 10 Bands nothing changes...the sliders aren't reduced in number nor are they linked so it's effectively only 10 bands.
I have heard from some others that it works in other applications but not using those apps I have no idea really. It may just be a filter in those apps with the same name. In FCP, the 10 band setting seems to have no effect.
QUICK TIP: While playing back an edit and having this or other filters active, you can use a mouse like the Mighty Mouse to adjust the sliders in real time during playback when normally it would stop if you click and drag on a slider. Just position the cursor over a slider and use your scroll wheel/ball...just don't click or playback will likely stop.
Thursday, November 19, 2009
Syncing Two Mics...after the fact

You know about sub-frame audio editing but let's say the audio has already been edited into your timeline and a re-edit isn't feasible.
FCP (as far as I know) has no simple way to adjust audio in the timeline in less-than-a-frame increments. If you adjust the In and Out points of an edited-in audio clip with Shift held down to alter it by a sub-frame it'll just adjust the length of the clip and reset the In point provided there's space available in the Timeline.
A handy way to get two mics that are ever so slightly out of sync into sync is to apply the AUSampleDelay audio filter to one of the audio clips.
Get your audio as close to synced as possible in the Timeline.
01) I like to turn off Snapping (tap the "n" key), then tap the "s" key for the Slip Tool.
02) Click on the audio clip that you want to get closer to being into sync and after you click and hold, hold down the Command key to enable more precise adjustments. Move your audio clip one frame to the left or the right (trial and error to see which sounds better).
03) Now, head over to Effects > Audio Filters > AUSampleDelay and add it to your clip. Then start adjusting the "in to out delay" number by increments of 1000 or so until your audio is pretty much in sync. This, again, will be some Trial and Error. (some prefer to call this Trial and Improvement...sigh)
What AUSampleDelay does is tell the audio of an audio clip it's applied to to hold it's horses for a little bit before it starts playing. So if the other mic's audio is running ahead of the second mic's audio, you can tell it to wait just a fraction of a second before it starts so they both start simultaneously.
Quick Tip: Hit Command + 5 to get Focus on the Effects Window, then hit Command + F and type in "AUSample" to quickly get to the filter.
Subscribe to:
Posts (Atom)

