Monday, December 27, 2010

QuickTime Pro's "Conform aperture to" setting

In case you're not quite confused enough Apple has updated it's knowledge base article on QuickTime Pro's Conform Aperture To setting.

  • Clean: The recommended setting for most video. Crops the video to the area of frame free from digitization artifacts and applies pixel aspect ratio correction. A 4:3 DV NTSC track appears as 640 x 480; a 16:9 DV NTSC track appears as 853 x 480.
  • Production: Used for video production. Shows all pixels in the the video including the edges and corrects for pixel aspect ratio. A 4:3 DV NTSC track appears as 654 x 480; a 16:9 DV NTSC track appears as 873 x 480."
Got that?

Clean 16:9 DV NTSC is 853x480 while Production's is 873x480. Likewise Clean's 4:3 DV NTSC is 640x480 while Production is 654x480.

There. Hopefully you're a little more confused than before. I get confused over this stuff all the time. Don't even start thinking about what happens when a client plays these with something other than QuickTime Pro...just...don't. And don't think about Square vs non-square pixels either. Seriously. Don't.

Wednesday, December 22, 2010

Clients & Codecs

When your assistant sends off "master" exports to your client make sure that the client can actually play them so you don't get a call at 5:30pm that the video "won't play". And by that I mean explain to your assistant that FCP will export (Export QuickTime Movie) at the codec (yeah yeah I know) it was originally ingested as.

So, for example, if you've shot or ingested something that's DVCPROHD it's likely the client won't have that if they don't have FCP installed. And no, it's not really the best idea to send them a copy of the codec for legal reasons and because many client's I've worked with won't have that kind of access to their machine since IT people love to lock non-IT people out of everything that's actually useful on their computers so you'll end up wasting time trying to sort that out then discover they don't have Admin access.

So a tip: Export your masters in a codec that the client has that they can use and view. Animation, ProRes, Apple Lossless, etc...stuff that they're likely to have by default.

Also, keep in mind what they'll need if they need to do more than just watch. If it's just an approval copy go with H.264, it's small and looks great. If they're on a Windows Box I'd still go with H.264 (seriously, .wmv? No. .avi is dead, although I do like a good .mkv).

If they need to transcode it (ie...it's been approved) to DVD or something send them an Animation or ProRes so they can do with it as they see fit.

Friday, December 17, 2010

The Hidden "H" 50% Key

Here's one I'll bet few people know.

Place your cursor over either the Viewer or the Canvas then hold down the H key.

You should see the Viewer or Canvas pop out at 50% size no matter what it was originally set to. Why? I dunno, it's probably some function or preference or something I've missed all these years. But it's pretty cool nonetheless and could be handy since 50% gives a clearer representation of your footage than odd numbered percentages, although 50% won't reveal interlacing as 100% does. Man I'm up late.

Thursday, December 16, 2010

iTunes, Gracenote and Client's Audio CDs

I get audio CD's from clients all the time which they've burned music or VO's or sound effects on to. The thing is unless you've told iTunes to:

A: Not launch when an audio CD in inserted.
B: Not to query Gracenote for CD/Track names

You'll end up with some pretty weird stuff as the name of the Disc and Track names. I find this pretty annoying which is why I've turned off all that stuff on iTunes here at the editing command center. But, when you are away from the Mothership and have to deal with this stuff you should be aware of what's happening.

Today, I was at a client's place and they decided rather than give me the audio cd they had in hand, one they burned off and quite likely the only copy, they decided they wanted to give me the tracks on a flash drive. Great! I love LOVE flash drives instead of optical discs. However...

When they handed it to me and I checked it right there and then on their computer the tracks were there, they played but there were named completely totally and bizarrely incorrectly. What had happened was that they had popped in the burned Audio CD, iTunes fired up, query'd Gracenote and decided it was someone's mix-tape CD (mix-CD?) from what was likely China. Whomever had made the CD originally, in fact, whomever had made the audio tracks, never named them I'm guessing.

Not a big issue if there's just a track or two but this audio CD had 40+ tracks of sound effects. The Finder had copied over the tracks as named by iTunes. I explained to them what happened, no, it's not a virus, no you haven't been hacked and no, they're not watching you on your webcam nor have they stolen your Facebook/Linkedin/Twitter/Whateverthehellsocialnetworkingcrapyouuse password (I should be as lucky). And you're right, I haven't "friended" you.

I told her I can't rename the tracks accurately. There are 40 of them and I don't know one from the other...yet.

So to fix this issue in the future I did a few things:

1. I hit Command + Comma in iTunes to bring up the Prefs.
2. Under General I unticked "Automatically retrieve CD track names from internet".
3. I went to username/Library/Preferences and deleted (emptied trash, my word was it full...had she ever emptied it?) "CD Info.cdib" which is where iTunes stores it's metadata on CD's it's looked up.

As an aside you can edit this file with something like BBEdit if you feel like it to remove the offending CD. You'll see a pattern to how they're listed but I wasn't in the mood and it was so large and Command + F (find) wasn't finding the misnamed names I didn't bother.

4. Eject the Audio CD.
5. Re-insert the Audio CD and saw that it was shown as "Audio CD" with "Track 01" etc...
6. Told her to (and showed her how) name the tracks what they needed to be named and to call me later. Yes, I'll leave the flash drive.

But what about the original audio files you ask? Surely they were named correctly? I imagine they would be if she could find them. I suspect they were in the trash I emptied. Go me!

Tuesday, December 14, 2010

Clients don't understand Container Formats


Once again a client asked me for "an avi" of a video. Avi was introduced in 1992 or so by Microsoft and has really been a positive and exciting boon to the pirated movie industry ever since. Aside from that it continues to cause headaches for "video people" and fellow "creatives" like myself.

.mov, .mkv, .avi and others are containers which mean they're like sandwiches, I tell clients. (Did you see that? I began a sentence with a period, hah! Mrs. Roberts was wrong!) Not all sandwiches are good, and asking me for "a quicktime" or "an mov" or "an avi" is like asking me for "a sandwich on white bread". You've specified that you want a sandwich (video file), with white bread (container format) but you have yet to tell me what kind of sandwich you want (codec).

This seems to be the only way to get through to some clients. "You're ordering a sandwich with white bread but I don't know what kind of sandwich you want. PB&J? Mustard and Lettuce? Cheese and Anchovies?" "What do you recommend?" is usually their response. I dunno. What kind of sandwich does the thingy that you're going to play it on ask for? In the manual. Yes, that one, the one you didn't read.

Today I literally said to a particularly ornery client, "I need to know what you want between the bread, otherwise we're going to have to try a bunch and see which works and looks good." See, I'm making a video in an outdated format, using outdated software for a client's outdated hardware. This is the kinda fun that only a college education can provide, kids.

Things like H.264 solve this problem. They're PB&J sandwiches all the time. And something known as a "standard".

The second most oft repeated phrase from me on the phone is "No, I wouldn't recommend a .wmv."

Thursday, December 9, 2010

Reduce AVI's skipping in VLC

During a break editing today a client decided to show me some of their past projects. They were encoded by someone at some point as .AVI's but they were skipping. While we were watching them she apologized and mentioned that all AVI's seem to skip for her.

So that got me curious and I played the same file with Movist which played back without skipping but I mentioned to her that Movist hasn't been updated for about 8 months so don't rely on it forever. However, the skipping problem was still bothering me in VLC. Checking her console logs I found mentions of first frame isn't a keyframe over and over aligning with the skipping. Not much to do about that as far as I know but there were some delay errors listed as well.

So delving into it's complex array of preferences I found the Caching Value which was set to 300ms. You can get there by hitting COMMAND + , (comma) in VLC and then clicking on the "All" radio button, Access Modules > File. Whew.

At the top you'll see "Caching value (ms)" and some number, likely 300. I just bumped it up to 1000 (1000 ms = 1 sec) and hit save.

The skipping is a lot better but there still is the occasional glitch as well as some very brief audio skips. I'm still not sure what can be done about them since Movist seems to handle the same file on the same hardware without issues. It may be some bug in VLC, I'm just not sure.

Wednesday, December 8, 2010

Failure Rates of Solid State Drives

It's in French but this article has an interesting list of failure rates of SSDs (Solid State Drives). The translated version is here.

SSD's are really too young to really get a sense of their reliability in the long term but at least this is a start.

For the 2TB drives:
"- 9.71%: WD Caviar Black WD2001FASS 
- 6.87% Hitachi Deskstar 7K2000 
- 4.83%: WD Caviar Green WD20EARS 
- 4.35% Seagate Barracuda LP 
- 4.17%: Samsung EcoGreen F3 
- 2.90%: WD Caviar Green WD20EADS"

There is more info at the site.

Friday, November 26, 2010

Final Cut Studio $799 at B&H

B&H has Final Cut Studio for $799 if you're looking for a copy for that special someone.

Wednesday, November 24, 2010

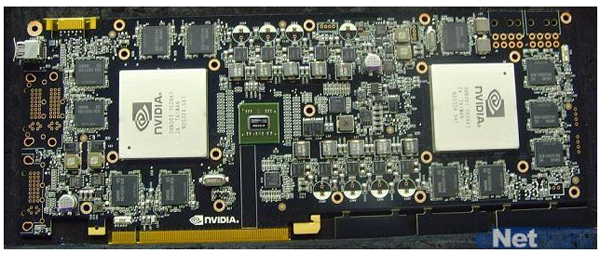
Nvidia's GeForce GTX 595?

Hardmac has an interesting bit of info about a potential future graphics card.


They're calling it the GeForce GTX 595, but the real interesting thing is that the photo of it shows two Fermi GPUs on the board. If true, that'll be some considerable power for, as they mention, a future version of Final Cut Suite.

Combine that with the recent rumor of a Final Cut Studio update sometime around April 2011 and things start becoming interesting.

Thursday, November 18, 2010

Not Enough Disk Space In Target Folder error

I ran across this error in DVD Studio Pro today:

"Not Enough Disk Space In Target Folder"

But, the fix is surprisingly simple; basically it means that the "build" folder isn't large enough to hold the VIDEO_TS folder that DVD Studio needs to make before burning the DVD. Here's a quick way to fix it:

01) In DVD Studio Pro hit Command + , (comma) to open the prefs.
02) Goto the "Destinations" button/tab.
03) For "Show:" select "Build/Format"
04) For "Location:" select someplace that has at least 5GBs of space, preferably 10 Gigs.
05) Tap OK.

Wednesday, November 17, 2010

The AUDIO_TS Folder or Why I didn't sleep last night.

Clients never cease to amaze me. Yesterday I burned off a DVD Review copy for a client and they couldn't play it. Ok, I said to myself, no biggie it was probably a finicky player which thought it had bad disc or bad burn, which happens. I asked them if they tried the backup disc I had also sent along.

"Oh yeah, that one wouldn't play either." At least they were nice about it.

Potential problems filtered though my head. I checked the file structure of the image I kept just in case and it seemed okay; I had tested the DVDs (both of 'em) on a stand-alone player here before sending them and both worked, so I was stumped. A few more rounds on the phone and just out of pure curiosity I asked what they were trying to play it on. "The lobby dvd thing there." Okay, almost helpful. So I decided to ask the exact model number of the player they were using mumbling something about "firmware" and pretending to be interested in some obscure facet of DVD Player technology they couldn't possibly understand.

Googling the model number of this player revealed it was older than some stromatolites which inexorably started me falling down the WikiHole™ until I discovered this little tidbit of info:

The AUDIO_TS folder is there for backwards compatibility with older-than-dirt DVD Players even though it's used for DVD Audio Discs (sometimes called DVD-A discs) which hardly anyone one makes anymore.

Wha? Yup, their DVD Player was so old that it required an AUDIO_TS folder on a video only DVD. Silly me had not included one because I had never needed one before in the history of me burning DVDs for clients.

So lesson here is to really never underestimate client's hardware.

If they have any:
"Yeah all of our employee laptops have DVD players in their laptops."
Oh, okay great, I'll make 1000 copies for you guys by the end of next week."

 NEXT WEEK.

"No those are CD-ROM drives, not DVD Players in your employee laptops. Where's my check?"

Sunday, November 14, 2010

Netflix Key Commands & Hidden or Secret options

A client was showing me a "look" they were going for by showing me a bit of a film on Netflix. While we were watching it I missed the chair I was trying to sit down in, planted my hand on the keyboard and the video paused and I saw Netflix change to it's fast forward and rewind preview thumbnail screens.


Experimenting around I found that like Spacebar, Return will Play/Resume playback but what's more, is that if you hit Shift + Return (Control + Spacebar works also) you'll see Netflix switch to it's thumbnail fast forward rewind interface and even more the Left and Right Arrow Keys will advance and rewind the video (thumbnails) by 10 seconds at a time. Hitting Return will start playback at the new location.

Yeah yeah, not a Final Cut Studio tip but I did stumble upon it (literally) and it was pretty handy to find certain frames that the client wanted to show me.

UPDATE:

Some other interesting things you can do in Netflix.

1. Right Click on a streaming video and select "Silverlight Preferences": lots of stuff to monkey with here. This only seems to work when NOT in full screen mode.

This actually launches a small app located at: /Library/Internet Plug-Ins/Silverlight.plugin/Contents/Resources/Silverlight Preferences

2. I couldn't get it to work on a Mac but apparently you can hold down SHIFT and Right-Click on a Windows machine to bring up a secret debug menu.

3. Diagnostics Menu: Shift + Control + Option + M brings up the hidden diagnostics menu. Again, this works when not in full screen mode.

A: Shift + Control + Option + S = Stream Menu
B: Shift + Control + Option + D = A/V Stats
C: Shift + Control + Option + L = Logging Window
D: Shift + Control + Option + P = Player Info Window
E: Shift + Control + Option + C = Frame Rate + Mysterious Numbers.  Green Controls. (Hit this in not full screen mode [windowed mode I guess?] then drop into full screen mode.)

Wednesday, October 27, 2010

Googling Final Cut Pro 7

So I'm looking up something about FCP7 in Google and Google decides to try and help me. Just thought I'd mention this not just because it's hilarious but because it's pretty sad.

Disk Drill

Disk Drill (FREE while it's in beta) is a data recovery app for recovering all...heck I'll let them explain it:

"Disk Drill, Mac Data Recovery Software, recovers data from HFS/HFS+, FAT, NTFS & other file systems right from your Mac. It helps you undelete Mac OS files using its 2 powerful Mac recovery methods: quick or deep scanning. Disk Drill data recovery locates and recovers deleted files from any mountable media like your main drive, external hard disk, memory cards, etc. Disk Drill can recover photos, music, documents, applications and many other known formats."


It's free for now and pretty shiny spiffy and all.


It's really nice when a client deletes files that don't really look important mainly because they have utterly no idea what they are (.xmp wha?) and what you don't know can't hurt you right?. However, it does tack on billable hours for editors so really, if you think about it Disk Drill has the potential to pay for itself with only a few clueless clients.


It's like a stomach pump for lost files.

Tuesday, October 26, 2010

Ripping Sections of DVDs with Free Stuff

I've been working on a monster of a documentary and some of the footage is showing up on DVDs despite what I've been telling sources and clients. I am typing this in english right?

So here's my (free) workflow for ripping portions of source DVDs to extract the bits of footage that's needed for this project.

You'll need:

MPEG Streamclip
Perian

Optional:
Fairmount

I'm avoiding using Cinematize Pro because, frankly, it's old. I think the last update was something like two years ago. Ok, here we go...

0) Optionally, use Fairmount to copy the DVD's VIDEO_TS to your hard drive. (I'll let you figure this one out on your own but it's of Very Low Complexity)
1) Open up the VIDEO_TS folder and start looking at the .VOB files until you find the one with the clip you need. With Perian, you can open them up in Quicktime Player 7 (which I like to call Quicktime That Doesn't Suck).
2. Make notes of which .VOB files you need and then open them up with MPEG Streamclip. Why not open then with MPEG Streamclip right away? It's your choice but I feel that Quicktime is faster for previewing.

Oh, Quicktime will likely be unable to play the audio since they're MUXed files so if audio is important head straight to MPEG Streamclip here. I should have told you that earlier.

Now, when you open a .VOB file with MPEG Streamclip you may (probably will) see this:

Since the purpose of this post is to just get sections of .VOB files and not the entire file hit "Open 1 file".

3) Now, set In and Out points in MPEG Streamclip using the I and O keys. How about that?
4) Under File in MPEG Streamclip select "Export to Quicktime..." and choose your poison. I like ProRes but select whatever you want. Hit "Make Movie" and grab a sip of coffee.
5) There is no step 5. Hah!

Wednesday, October 20, 2010

VHS Tapes of Death

I've been handed some VHS tapes of some exceptionally rare material for an upcoming documentary I'm going to be editing. After setting up the 'ol VHS capture setup one tape (which thankfully wasn't the ONLY copy in existence) decided to get stuck it it's shell and smear debris all over the VCR's head.

Taking apart the VCR and cleaning the head thoroughly with some alcohol and lint-free cloth the next tape I put in (which was a known good test tape) was extremely snowy. I popped that tape out, popped another one in and it played clear, as hoped. Putting the test tape back in it was fine as well. Subsequent VHS tapes (even the literally only copy left on Earth) all played 100%.

So, like some possessed miniDV tapes of yore, somehow running a second known good tape "fixed" the VCR's sniffles. I'm guessing there was some lint or alcohol still left somewhere that the tape whisked away but thinking about possessed electronics a la Carnage is more fun.

Friday, October 8, 2010

Mini DV Tapes of Death

I've always had a hate-hate relationship with MiniDV tapes. Tonight was even further evidence that Mini DV tapes were invented as stress multipliers by anti-social engineers. I'm convinced of it.

So I'm working on a documentary that's using some footage from some old Mini DV tapes which I've been loading in via the tape deck in an HVX200 firewired into the Mac here. Mostly they've been issue free thanks in no small part to FCP's ability to reconcile 12bit and 16bit audio post-capture but there is this one tape that refuses to cooperate.

And similar to the infamous Iomega Click of Death this tape seems to "infect" the tape drive and prevent other tapes from proper playback. So, for example, Tape A has a massive dropout and never recovers, remove it and pop in an immediately previously perfectly fine Tape B and it now too has playback issues -mainly blue horizontal stripes and no audio- which are identical to Tape A.

Neither Powering down everything or ejecting and inserting the tape multiple times nor cleaning the drive did any good. So I grabbed a tape that hadn't been in this camera before and tapped play. It plays perfectly fine.

Figuring the planets have moved out of some portentous alignment I popped the problematic tape back in the drive and it's fine, zero issues now, naturally.

So there you have it. If you have a problem Mini DV tape eject it and run some other tapes through the deck to clear out the evil and then try the possessed tape again. I yelled at the tape as well (deadlines...ha, love 'em) but statistically there isn't enough data to say that was of any appreciable help other than to boost my emasculated deflated ego.

Saturday, October 2, 2010

Why Text Can't be Dragged Any Longer

You've placed some text into your Timeline and need to drag it out (yes, you can COMMAND + J it instead, I know) but for some reason you can't drag it any longer. Cthulhu has decided to make your afternoon a little more hassleful but you can fight back.


You need the lower text element to be as long as the other but it won't drag (extend) any further. Here's why:


If you double click the text element in the Timeline to load it into the Viewer (that's what those perfs are telling you and if you don't know what a perf is I'll cry and feel even older, thanks) you'll see that the portion of the text you've placed into the Timeline, as demarcated by the In and Out points is near the end of the text element. You can't drag it past the "end" of the text element. The solution? Move the In and Out points of the text element.


This is what it'll look like after you move the In and Out points of the text element further back. Since text elements don't change (default ones anyway) the text on screen will look the same. But how can you move both simultaneously?

Hold down SHIFT and Click and Drag either the In or Out point and you'll be able to slide both, simultaneously left (or right if for some reason you want to do that).

Done.

Btw, and I should have mentioned this originally with the post but as mentioned in the comments for this post you can tap S in FCP and Slip the text element right in the Timeline. Thanks for reminding me, folks!

How to Un-Nest a Nested Sequence

It you've nested a portion of your timeline and for some reason need it not nested to make some adjustments there's a simple way to un-nest a nested sequence.

1) Find the Nest in the Browser.
2) Drag it to where you want it in the Timeline (you may need to be mindful of target tracks depending on the nest and timeline settings) but before you let go of the mouse...
3) Hold down COMMAND. That is to say, hold down COMMAND after you've begun dragging the nest into the Timeline. When you hold COMMAND you'll see the "shadow" of the nest explode to un-nested.
4) Let go of the mouse and you're done.

Thursday, September 9, 2010

Audio Waveform Bug (redux)

A while ago I posted about how FCP (6.x) has trouble with displaying Audio Waveforms while it's not zoomed in. Today I ran into another interesting Audio Waveform issue again with FCP 6.x (thanks to the client's machine I'm working on).

Here's the before:


You can see that only one waveform is shown and even that's fragmented. The top two audio tracks are disabled via Control + B. When I delete them since they're not needed this is the consistent result:


Suddenly FCP decides to show the lower audio track's waveforms all the time when it was horribly inconsistent before. In fact, it was so bad before that I wasn't able to really edit the audio precisely quickly because the waveforms would come and go. I tried restarting FCP, the Mac, clearing caches (including the waveform cache) and nothing helped until I just deleted the audio tracks that aren't needed anymore (until the client wants them back or some nonsense)

Wednesday, September 8, 2010

VLC for the iPad

VLC is coming to the iPad. Suddenly the iPad seems a lot more handy for dealing with clients.

How to Copy your own discs made in a Sony DVD recorder

I'm not sure what Sony is thinking here but if you burn a DVD using one of their DVD Recorders and then pop it into your Mac you'll see the contents are shown as empty despite it playing in DVD Player.app.


It's not empty. There really is a VIDEO_TS folder in there, only Sony doesn't want you to see it. I'm not sure what they've done to make it invisible since it'll still be invisible even if you show hidden files in the Finder (still gotta figure that one out, see below). Sure it'll show up on some Windows and Ubuntu boxes but not on Snow Leopard. Lets see if we can just change the permissions to access the VIDEO_TS folder...


Nope.

So how can you copy it?

Well, the usual methods work like Toast & Disk Utility although I had an issue with Disk Utility not ever "finishing" the disc. It just unmounted, never said it was done and the disc kept spinning in the drive forcing me to restart the Mac to get it to eject (Hey, holding the mouse button while the Mac boots still ejects stuff after all these years...go figure).

So, angry at Sony for hiding the VIDEO_TS folder from me even though the client who handed it to me OWNS the content on the disc (and couldn't have known about Sony's degage draconian attitude) I decided to find a way to get to the VIDEO_TS folder just to spite them in Snow Leopard. Here's what I did:

1. Pop the disc in. Open it in a Finder window.
2. Launch the Terminal.
3. Type cd (spacebar) and then click and hold on the icon at the top of the Finder window for the disc and after a beat drag it into the Terminal to set the path.
4. Hit Return while in the Terminal.
5. For fun type ls (for list) and see "ls: .: Permission denied" so force it to list the contents by typing "sudo ls" without the quotes and then enter your password and hit return.
6. Bang. VIDEO_TS is listed. Screw Sony.
7. Copy this to your Desktop with "sudo cp -R VIDEO_TS ~/Desktop" sans quotes and enter your password. If you want to copy to a place other than the desktop just put a space after VIDEO_TS and drag the window icon of the volume or folder you want to copy it to to the Terminal window. An example would be "sudo cp -R VIDEO_TS Volumes/volumename/foldername"
8. Toss the VIDEO_TS folder into Disk Utility or Toast and burn it as the client requested and screw Sony.
9. Feel free to change the permissions for the VIDEO_TS folder as you need from the Finder now.

About why the VIDEO_TS folder is invisible I suspect it has something to do with this:

Macintosh:SONY_DVD_RECORDER_VOLUME user$ sudo ls -al
total 8

d--x--x---   3 4294967295  nogroup   88 Jan  2  2004 .
drwxrwxrwt@ 12 root        admin    408 Sep  8 23:03 ..
dr-xr-xr-x   2 4294967295  nogroup  768 Jan  2  2004 VIDEO_TS
Macintosh:SONY_DVD_RECORDER_VOLUME user$ 

"sudo ls -al" forces the Terminal to show the permissions of the files in the directory and as you can see two files are assigned to "nogroup". I suspect this is what's helping to hide the folder although I'm not done investigating just yet.

UPDATE:

Another option is to just pop the disc into a box running Ubuntu and simply drag it to some volume to copy it. How can you not love that?

Monday, September 6, 2010

Dimmer for Mac

Dimmer is a new FREE app that adds some additional levels of brightness to your display.

"Dimmer is an application that helps give that extra detail to the brightness of your display.
By all means the brightness settings on Mac OS X are great but Dimmer allows that extra depth of brightness. This is a great application to use when you find the lowest display setting is too dark and the second lowest display setting is slightly too bright."

Thursday, September 2, 2010

Error Code -50

Sometimes you'll run across this handy error message while trying to copy something to a drive. I have no idea what it means. But I do know that the Finder thinks the drive is still in use by something when in reality it's not.


- lsof | grep in the terminal reveals nothing.
- Using an app like WhatsOpen reveals nothing.
- Relaunching the Finder doesn't help.
- Repairing the drive with Disk Utility won't work because...
- You can't eject the drive.

You have two options in my experience.

A. Force Eject the drive.
B. Restart.

Ejecting Hard Drives

Would it be so difficult for the Finder to let us know which drive's cord was tripped over at a live event?


It couldn't be that hard to just name the volume that vanished right?

Monday, August 30, 2010

Super-VHS

Super-VHS has a pretty interesting history. Playing catch up to Betamax too late with too little while SuperBeta and ED-Beta tried, the extended recording times of VHS quietly conquered* all.

A friend recently called me to ask me about how to transfer some S-VHS to a hard drive for editing. He mentioned in passing that it wasn't a "real" S-VHS tape but didn't know what that meant. Now, quite unfortunately, I've dealt with S-VHS before at a local TV station who uses nothing but (and still does...) and learned a thing or two about S-VHS that you won't find in the manual but you will find mentioned online after whistling for The Great Gazzogle:


Modifying VHS Cassettes for S-VHS recordings

Videophiles were the first to theorize that since the only distinguishing feature of an S-VHS tape is a small 3mm hole in the cassette, it should be possible to use more common and inexpensive VHS tapes by duplicating that hole. In attempts to record S-VHS content to a VHS tape, picture quality is somewhat better however after several months the quality drops dramatically to a point of severe graininess or pixilation in dark areas in the images, due to the standard tape's lack of required coercivity. Eventually the recording becomes unwatchable however but can be re-recorded without problems in VHS format as the oxide media is still undamaged, although re-recording in S-VHS format will eventually encounter the same problems as before.

Is that true? Yep. In my experience is, although to varying degrees of "lost". 
Take a VHS tape, drill a small hole in the case in the lower left in the groove, record your precious memories and then promptly loose them in a year or three. It's the dark secret lurking in many new stations, libraries, high school and university's archives just awaiting discovery and a few tears.

So a tape is essentially lost to technology. While backups are a good idea, backups to different formats is an even better idea.
Thankfully, 5 1/4 floppies didn't have a coercivity problem to you can still play that copy of Amazon Warrior you kept on the b-side of Project Firestart.

* with wee bit of help from the porn industry.

Wednesday, August 18, 2010

RT Still Cache Error Message

Here's an error message I haven't seen in a while:


This is what you get when you load several hundred images into the timeline at once.

Still-Freeze Duration Bug

On a machine I still have Final Cut 6.0.6 installed I keep running into a bug with Still-Freeze Durations.

The duration Final Cut assigns an imported still image is determined by the Editing tab of the User Preferences (Option + Q).


However, for me in Final Cut Pro (and if I'm recalling correctly, versions after 5.0) the Still portion of Still/Freeze Duration doesn't exactly work.

In my experience when you import a still image FCP will set it's duration to exactly one second less than what's set in the Editing prefs. The Freeze duration will be correct however, meaning that if you have a clip loaded into the Viewer and hit Shift + N to make a freeze frame it'll be whatever the Editing tab's Still/Freeze Duration is set to.

But, if you say, drag a photo into the bin it'll be one second shorter.


On the left is the bin, on the right is the preference. For me, it's consistent.

What's Keyframed in the Wireframe?

Here's something you may not have noticed.

I think the keyframe indicator in the Motion tab of the Viewer is pretty horrible. It's buggy, has scaling problems and is generally trickier to use than it should be so here's a tiny bit of help.

When you set some keyframes, and you have Wireframe + Image on in the Canvas (toggle it with "w") relevant parts of the wireframe will turn green to indicate that they have a keyframe and that the playhead is currently on their keyframe.


In the above image you can see that among the green there are some white indicators, namely the "1" and the upper left and lower right handles. Here's what the Basic Motion tab looks like for this shot of clouds:


You can see that Scale, Center, Upper Right and Lower Left all have keyframes. Scale is the large X-like crossing lines, Center is the center handle and the upper right and lower left handles are right where they should be. If the "1" were green, that would mean that the playhead is on a Anchor Point keyframe.

Keep notes inside a Final Cut project (and save file)

Two days ago out of the blue I recieved a panicked call from a friend who needed something cut together fast. As in I would have about 3 hours to cut something together before it went live that would normally take about 5 hours. Needless to say I talked them into paring the project down to something managable and actually feasible.

While I worked on the project the client sent me some notes which I needed to keep while I moved from one location to another so I decided to find a way to have brief notes displayed in Final Cut while I edited that would be saved along with the project. Here's what I came up with:


1. Hit Control + X to open the basic Text Generator.
2. Type or paste in your notes.
3. Goto the Video Tab of the Text Generator and then drag the preview image (the one in the Viewer) to your footage bin; it'll turn into a Still.
4. Change it's name to something useful.
5. Save the project.

Now you'll have a text note that's saved along with the project file. You can edit it, rename it and even apply labels to it.

Thursday, August 12, 2010

Canvas Corruption

Sometimes the Canvas window gets a little confused.

When Firewire Ports Go Bad

A friend as a Firewire port that's slowly going. As it gets progressively worse it starts to do some interesting things when you mount Firewire hard drives or cameras. One thing is this when you mount an HVX-200:

As you can see the files listed on here not only are not real files you'd find on an HVX-200 mount but they make no real sense. This behavior was consistent with only the names changing.

For me, the most interesting thing was that FCP would see the footage while the P2 card was mounted like this but there would be massive artifacts during playback. Plugging the exact same camera and card using the same Firewire cable on another Mac acted normally.

Out of curiosity I reset the PRAM, SMC and all that on the Mac without any of it helping.

Monday, August 9, 2010

Log & Capture Drop-Outs Tip

I've been gathering up and organizing footage for an upcoming documentary. As you can imagine there are boxes and boxes (which spiders LOVE to hide in) of old VHS and Hi-8mm tapes. Not only are tapes surprisingly delicate after being warehoused in non-air conditioned buildings but they also love to stick to themselves after not being run through a deck for 20+years.

As I catalog and load tapes into FCP with Log & Capture I've noticed that some Hi-8mm tapes have glitches in them that only FCP or my analog to digital converter (Canopus) seem to be affected by. When the tape plays in the old deck or camera visually and aurally it's fine, but FCPs Log & Capture window will jump and skip and just not show entire seconds worth of footage sometimes.

When you play back the captured footage portions are literally skipped as if FCP decided to do ripple-edits on it's own, randomly.

As this footage is important, and often the only copies left on Earth, I had to find a way to load in all the footage minus these mysterious skips. What mostly does the trick is to connect the old tape deck to the converter box via an s-video cable; that virtually eliminates the drop-outs. Conventional composite video can't cut it and I'm not sure why. What's more mysterious is that the drop-outs are always in the exact same  place.

So, if you have some persistent drop-outs while loading in old tapes try using s-video, technically the quality will be slightly higher (but you likely won't notice) and it'll help eliminate most of the drop-outs. If anyone has any info about these kinds of mysterious drop-outs let me know.

Friday, August 6, 2010

Quickly Name New Files in Open and Save Dialogs

Here's a quick one.

When you're exporting or saving a file that doesn't have the name you want, and you need to name it something based on another file just click on a similarly named (and greyed out) file in the Open/Save dialog to pre-name it that file name.

For example, lets say you have to export 10 different versions of a edited piece and don't want to type in "Video With A Needlessly Long Name 01", "Video With A Needlessly Long Name 02"...you can click on the greyed out, already there in the folder file with the name you want and the OS will name the currently ready to be exported or saved file identically to the one you clicked on so all you have to do is append your numbering convention, 02, B, Alt, whatever you use.

Thursday, July 29, 2010

Clients and Peak Meters

Sometimes Clients insist on audio being louder, especially when you have background music with some VO (Voice Over). However, they have no idea with the audio meters mean and have no concept of what db means or why it's shown as a negative. Let alone trying to tell then why peaking is a bad bad thing.

They just like it all LOUD ENOUGH TO HEAR.

Here's what I do. When I know the audio is correct, the voice is around -6 or so, the music is (depending on the project) -12 or -20ish and they want to hear it LOUDER! I CAN'T HEAR IT! I quietly hold down SHIFT and nudge the Mac's audio up with the Increase Volume Key.

Shift will mute, while held down, the plonk noise of increasing or decreasing the audio.

They think the audio is now louder (I always try to keep my edit bays Mac's audio at at least two below maximum) and you won't have audio that needlessly peaks.

Another fun Audio volume trick is to hold down SHIFT + OPTION while you adjust the volume which lets you adjust the volume in 1/4 increments per visual block. I'm not sure if you can mute it while doing this though.

Monday, July 19, 2010

Interesting Rumors and News

1. Hardmac says Apple may be working on a new video format.
2. Hardmac also says that bigger BDXL may be more readily available.
3. MacRumors has a rumor that the next Mac Pro will have USB 3.0 and Firewire 3200.
4. TrueType bitecode patents have expired.

Friday, July 9, 2010

Setting Nothing as a Target Track

Here's something that's handier than you'd think.

When you're doing an assembly (say for a feature) and you want the image but not the audio or vice-versa rather than reach for the mouse to unselect a target track (ie...set it to nothing) try this:

For no video target track hit F6 + 0 (zero) or hit SHIFT + F6. Either way works.
For no audio 1 target track hit F7 + 0 (zero) or hit SHIFT + F7. Again, either way works.
For no audio 2 target track hit F8 + 0 (zero) or hit SHIFT + F8. Both function identically.

I find Shift + the f-key to be more convenient for me but see which works best for you. Some people like to keep track of track numbers in their head and Track 0 (zero) is "no target" in their way of thinking which is a great way of thinking about it.

The upshot of this is that since there are two commands that have the same function you can remap Shift+ the F-key to something else if you want.

Saturday, June 26, 2010

Importing Apple Pages scripts into Celtx

A client handed me a script (screenplay format, not two column AV, thankfully) that they had written in Apple Pages which is all well and good but the AD needs it in Celtx for whatever she's going to do with it.

Now, I love Celtx because it's simple, feature-rich and FREE (for most of it). And I have no problem with Pages myself; I use it nearly every day but getting something from Pages into Celtx and retaining all the formatting was a challenge.

There's a help page about precisely this here. See Celtx only imports plain text files and formats them as long as certain conventions are in the text file. So you'd think it's as easy as exporting the screenplay in Pages to a text file and then importing it into Celtx. Nope. Course not, silly.

See for some reason completely lost to me Pages does export Scene Headers (Slug Lines) as all capitals even though they're all capitals in the Pages document. I know. Maybe the original author messed something up, I dunno. Even copy and paste will not retain the all caps scene headers even if you paste it into a rich text document or a plain text one in SimpleTex...I mean TextEdit.

So to workaround this issue I did this:

0. Remove all pages numbers from pages and all Headers and Footers (use the Inspector Window)
1. In Pages export the script as a PDF file. File > Export >PDF
2. Open that PDF in Preview. (Scene Headers should still be in all caps)
3. Copy the text beginning with the FIRST INT. or EXT. (ignore the title page and anything before this) by selecting (dragging) from the first INT. or EXT. to some other text then hitting the End key to move to the end of the script and while HOLDING SHIFT click at the end of the script. It should all be highlighted now.

Be SURE that the highlight is from the very first INT. or EXT. till the end. For me it kept auto-annoyingly selecting a "FADE IN:" at the beginning but we'll deal with that in a 'mo.

4. Hit COMMAND+C to Copy.
5. Launch TextEdit and make sure it's set to Plain Text format. (Format > Make Plain Text)
6. Paste the clipboard's contents into the plain text document. COMMAND + V.

For me the FADE IN: that was highlighted when I did the copy wasn't pasted in. Weird. Double check the beginning of the script to make sure (again) that it begins with either EXT. or INT. Also double check to make sure that character names for their dialog are in all caps as well. Celtx uses these things to format the script and tell what's from what.

7. Save. COMMAND + S

8. Do this:

Importing from Pages for Macintosh

  • File->Export using the Plain Text Setting.
  • Open in BBedit ( the free version will work)
  • Delete all formatting characters at the beginning of the script; there will be some arrows or non alpha characters
  • Delete all the lines before the first text characters.
  • In BBedit, do Edit->Zap Gremlins, with the non-ASCII set to "Delete"
  • Use "Convert to ASCII" ( forget where the menu choice is)


Then Save.

9. Launch Celtx
10. Create a new "Film" project.
11. Select Script > Import Script from the menubar.

IT WILL NOT BE PERFECT. But it'll be close. I couldn't find a way to get it to import the script with 100% perfect formatting. The AD will go through and clean it up but for now, on short notice, this is the best I could come up with.

Anyone have any tips or suggestions?

Tuesday, June 22, 2010

iPhone 4's HD Video

Here's a sample of footage from an iPhone 4 shot at 720/30 in it's native H.264.

It looks good, a bit blown out and jerky but the image holds up nicely even with the complexity of the plants all around. The thing that bugs me -aside from nothing protecting the lens from a pretty massive kick- is that it seems to have a rolling shutter.

You can see it in action by scrubbing a little back and forth in the final second when the camera is looking at the house.

Tuesday, June 8, 2010

Metadata Hootenanny

Metadata Hootenanny.

What Does It Do? It allows you to edit and search the metadata that can be stored in QuickTime movies (mov files), including chapters. Quicktime files support a large number of metadata options, but the QuickTime Player doesn't provide an easy way of accessing them. Metadata Hootenanny does.

And it's FREE with a pretty cool icon.

Monday, June 7, 2010

Apple's Rumored Magic TrackPad Thing

I suspect this will play a key role in a future version of Final Cut Studio.

Just a hunch.

Adobe Audition on Mac

Someone has posted a video on Youtube that's causing some debate. It looks like Adobe Audition running on a Mac, which if true, and it is eventually released, would be very interesting. I think a lot of users may abandon Pro-Tools if the price point is low enough.

Of course if it's not ever officially released and isn't VMWare or something, I suspect that we'll start seeing many beta versions of this running in studios like some other bits of software that were never officially released and are used professionally even though they're pretty buggy. You know who I'm talking about.

Wednesday, June 2, 2010

Using Unsupported Devices on an iPad

More and more clients seem to be carrying around iPads now and they like stuff on them that they can look at. Here's a quickie tip from MacOSXHints for getting stuff onto the iPad with the Camera Connection Kit.

Basically just make a folder at root of the device named "DCIM" and put things in there.

The full tip is here and some limitations are here.

Personally I can't stand how the iPad (and iPods I guess) create an ENORMOUS "iPod Photo Cache" folder  when you sync things to the devices (that are sometimes larger than the original files!) but that's another post/rant.

Tuesday, June 1, 2010

Video Editing on iPad

From tonight's D8 talk with Steve Jobs:

"7:12PM Walt: So you made iWork for the iPad. Do you see things that the iPad can't do?

Steve: Well, you can imagine all sorts of things for the iPad. Video editing, content creation...

Walt: Does it require a faster processor?

Steve: Well time has a way of working these things out."


Link here.

Sunday, May 30, 2010

MediaInfo

A while ago I mentioned VideoSpec which is an app that will tell you all sorts of interesting things about video files. I used it to compare some video I made for an old tv station's equipment to some that they had that worked for their system and find out what was different.

Well VideoSpec is still great but it hasn't been updated since November 23rd 2009.

A friend tipped me off to MediaInfo which is very similar to VideoSpec only it's newer and also FREE.

You can check it out here.

Friday, May 28, 2010

Set Logging Bin Keyboard Command


A temp assistant pointed out something I did today that I didn't even realize I was doing because it's been a habit for so long.

I load in a great deal of footage with Command+Shift+8 (Log and Transfer) and when things are hectic and I need to keep this footage separate from that footage or whatever I just dump them into separate bins.

My temp assistant saw me madly hitting keys before loading in the footage and I had to think for a second of what I was doing.

0. Hit Option+J and set "Set Logging Bin" to be Command+Shift+B. Now make the Browser window active.
1. New Bin is Command+B.
2. After it's created type in a name for it.
3. Then hit Command+Shift+B (don't bother with Return) to set the name and Set Logging Bin.

It's quick and keeps things fresh and organized.

Wednesday, May 19, 2010

The Myths of Displays and Monitors

MaximumPC has a fun article on the myths of (useless) monitor controls and more here.

Google's WebM Video Codec .webm

A really nice breakdown of VP8 is here if you're interested. But a summary is thus:

"The spec consists largely of C code copy-pasted from the VP8 source code — up to and including TODOs, “optimizations”, and even C-specific hacks, such as workarounds for the undefined behavior of signed right shift on negative numbers. In many places it is simply outright opaque. Copy-pasted C code is not a spec. I may have complained about the H.264 spec being overly verbose, but at least it’s precise. The VP8 spec, by comparison, is imprecise, unclear, and overly short, leaving many portions of the format very vaguely explained. Some parts even explicitly refuse to fully explain a particular feature, pointing to highly-optimized, nigh-impossible-to-understand reference code for an explanation. There’s no way in hell anyone could write a decoder solely with this spec alone."

"WebM includes:


  • VP8, a high-quality video codec we are releasing today under a BSD-style, royalty-free license
  • Vorbis, an already open source and broadly implemented audio codec
  • a container format based on a subset of the Matroska media container"

====


Google has announced WebM (not a huge surprise given all the rumors) but you can check out the latest FFMpeg version to support it from Subversion here which is a bit surprising.
====
"WebM is an open, royalty-free, media file format designed for the web.
WebM defines the file container structure, video and audio formats. WebM files consist of video streams compressed with the VP8 video codec and audio streams compressed with the Vorbis audio codec. The WebM file structure is based on the Matroska container."
====
I'll goof around with it later on (possibly next week) and see what's what but I don't think we'll be editing with it very soon.
====


"Reversed complexity encoding / Z-frames: A type of frame that in encoding complexity is lower than a regular P-frame but is more compact. The catch is decoding computation needs to be higher. Specific technical approaches might include:


  • a combination of multi-frame processing with Wyner-Ziv coding
  • mixed quality encoding, where the Z-frames are non-reference frames interspersed with regular P-frames and coded at lower quality than the target quality. The decoder recovers a higher quality version of the Z-frames by multi-frame processing using information in the neighboring higher quality P-frames.
  • supplement the information transmitted for the Z-frame with additional helper information to regularize the reconstruction process on the decoder side. This could be a Wyner-Ziv layer, or something different."


====
Also of interest:
====


VP8 uses 14 bits for width and height, so the maximum resolution is 16384x16384 pixels. VP8 places no constraints on framerate or datarate.

and


The Developer Preview releases of browsers supporting WebM are not yet fully optimized and therefore have a higher computational footprint for screen rendering than we expect for the general releases. The computational efficiencies of the VP8 codec are more accurately measured today using codec-level development tools in the SDKs. Optimizations of the browser implementations are forthcoming.
====
Higher Computational footprint means it's really inefficient at the moment and eat a lot of CPU. Although, they do say in their FAQ:
====

"If I have a video card that accelerates video playback, will it accelerate VP8?
The performance of VP8 is very good in software, and we’re working closely with many video card and silicon vendors to add VP8 hardware acceleration to their chips."


Tuesday, May 18, 2010

Apple unleashes Ubillos on Final Cut Studio

"In 2007, Final Cut Pro's original lead developer, Randy Ubillos, completely redesigned iMovie '08 to streamline and simplify the iLife title. The changes prompted criticism from existing iMovie users, as the new app didn't do everything the previous versions did. Last January, Apple released an enhanced iMovie '09 version that addressed many of those missing elements in the new app.


The Final Cut Pro team has since been put back under the direction of Ubillos, according to information AppleInsider has obtained, with the aim of similarly improving Final Cut Studio and making it more appealing and useful to the needs of prosumers. Currently, Final Cut Pro is targeted at advanced professionals with a scaled down, less expensive Final Cut Express version sold to users who don't need all of its high end features. Because Apple now primarily sells the Express version, the company wants to rethink Final Cut Studio and scale its overall development to better fit the majority of its customers.
"

Full story.

Eek. The revised iMovie was an abomination. Hopefully Randy Ubillos won't destroy FCS in the same manner. 


UPDATE:


Steve Jobs has apparently said about the upcoming FCS release:


"We certainly do [care about Pro apps]. Folks who left were in support, not engineering. Next release will be awesome."

LINK

Clients Knowledge Base

I've been working on a monster of a project and today I receive an email from one of the clients who is using some of the footage for another project that they'd like the b-roll in "beta or jpeg".

I'll get right on that.


Reminds me of the time a client's "graphical engineer" (their term) sent me video exported from Photoshop as a gajillion layered .psd file.

Unshake

Unshake is a FREE app that tries to make blurred photos a little less blurry. While it'll never clarify a photo like in No Way Out it can help enough to salvage some photos.

Hey, it's free.

Thursday, April 22, 2010

Auto-Ejecting Western Digital's VCD

You already know I'm not a huge fan of Western Digital's new MyBook Studio line. But if you need to use these things (I have one for a client still sitting here) and cannot stand that VCD (Virtual CD) mounting each time you plug it in and having to manually unmount it as well as the HD itself there's a simple AppleScript that will auto-eject it for you.

MacOSXHints has a little article about it here.

Just in the interest of it not being lost in the morass of the intertubes I'm posting it here.


tell application "Finder"
  activate
  try
    eject disk "WD SmartWare"
  end try
end tell

It was submitted by "Anonymous" over there, unfortunately.

Tuesday, April 20, 2010

StarFire - Yet Another Transcoder

StarFire, a new video encoder that is NOT free ($8) has been released and is making the news rounds. I haven't had time to try it yet but it's yet another transcoder which people are looking to to replace VisualHub.

It's at version 1.0 and lists these features:

StarFire lets you encode your favorite video files to iPod, iPhone, AppleTV and PlayStation 3. It also lets you export to various format like MPEG-2, MPEG-4, H.264, DivX, FLV and DV.

Wednesday, April 14, 2010

Movist

I use VLC a lot to view all kinds of things and often recommend it to clients. It's still in development for the Mac and 1.1 is in beta now I think.

But a FREE video player app called Movist is really growing on me. It's lean, fast, has a nice GUI and is founded (surprise!) in FFMpeg.

Give it a spin and see what you think.

Thursday, April 8, 2010

Miro Video Converter


Miro Video Converter is a FREE (and Open Source) transcoding app. So far it looks good for its intended purpose.

Here's a list of it's capabilities so far:

Convert to MP4 Video
Convert AVI to MP4
Convert H264 to MP4
Convert MOV to MP4
Convert WMV to MP4
Convert XVID to MP4
Convert Theora to MP4
Convert MKV to MP4
Convert FLV to MP4


Add that it'll also transcode to Ogg Theora (video) and it's a pretty handy app.